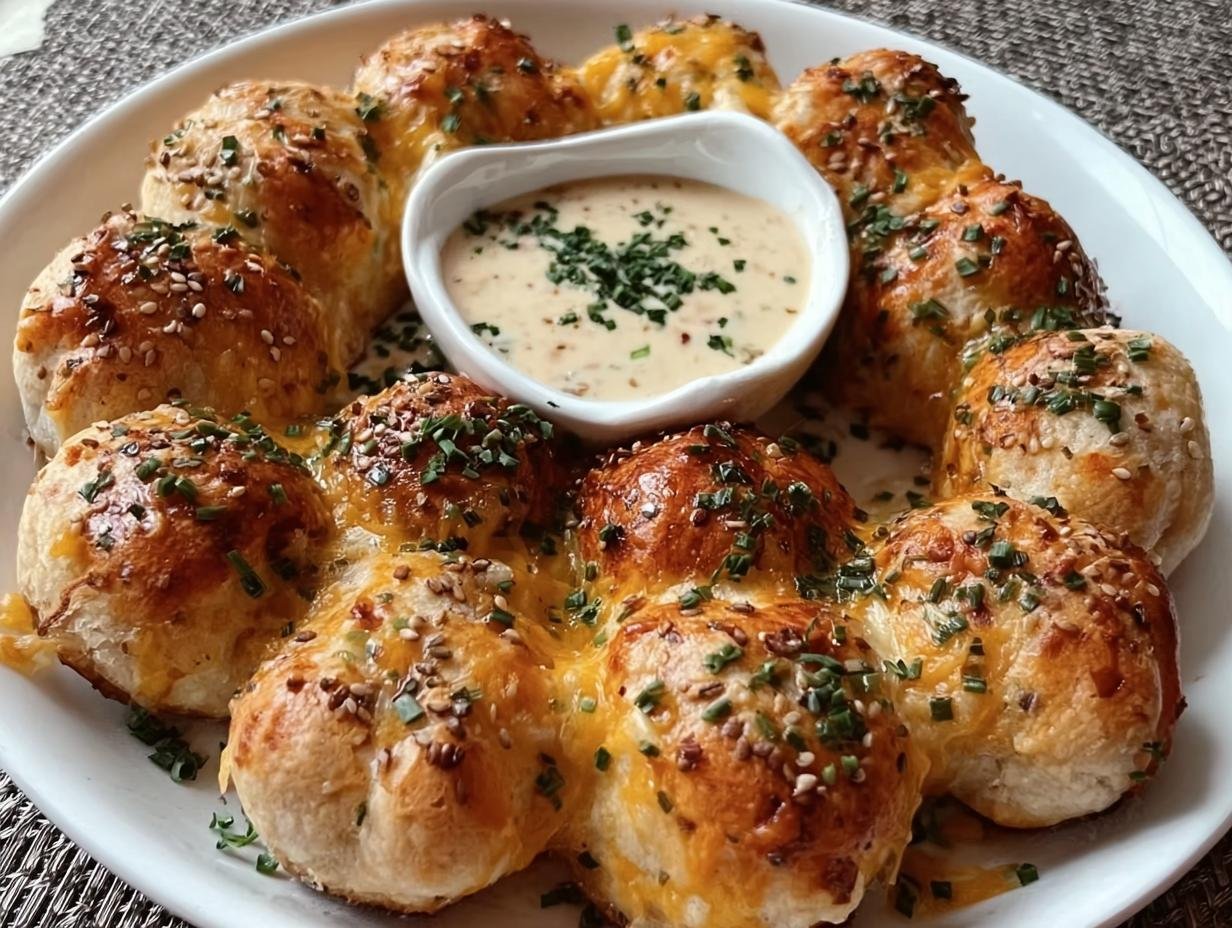
Garlic Dough Balls have become my absolute go-to appetizer for any gathering, and I’m so excited to share this recipe with you! They’re incredibly soft, bursting with garlicky flavor, and that creamy, dairy-free cheesy cashew dip is just divine. I first tried making these for a potluck, and they disappeared faster than I could count! The aroma of warm garlic and baking bread filled my kitchen, making everyone’s mouth water. If you’re looking for the perfect crowd-pleasing bite, these garlic bread balls are it. Let’s get cooking!
Why You’ll Love These Garlic Dough Balls
Get ready to impress your friends and family with these amazing garlic dough balls! They’re truly a game-changer for any occasion.
- They are incredibly soft garlic dough balls with a perfectly tender interior.
- The rich, creamy, dairy-free cashew dip is unbelievably delicious.
- This is an easy garlic dough balls recipe that even beginners can master.
- They make a fantastic vegan appetizer that everyone will rave about.
- The irresistible garlic butter topping adds a savory, aromatic finish.
- They are wonderfully versatile and pair perfectly with many dishes.
- The whole process is surprisingly simple from start to finish.
- You’ll love the delightful garlic flavor that makes them so addictive.
Ingredients for Homemade Garlic Dough Balls
Gathering your Garlic Dough Balls ingredients is the first step to creating this magic! You’ll need a few key components for both the dough balls and the incredible Cheesy Cashew Dip.
- 3 ½ cups (440 g) strong white bread flour – This is crucial for that fluffy texture we love.
- 2 teaspoons sugar – Feeds the yeast and helps with browning.
- 2 teaspoons instant yeast – For a quick and reliable rise.
- 1 ½ teaspoons salt – Balances the flavor and strengthens the dough.
- 1 ¼ cups (300 ml) warm water – The perfect temperature to activate the yeast.
- 3 tablespoons olive oil – Adds richness and tenderness to the dough.
- 3 tablespoons vegan butter, melted – For that golden, garlicky finish after baking.
- 4 garlic cloves, minced – The star of the show for that irresistible garlic flavor!
- ½ teaspoon dried oregano or parsley – Adds a lovely herbaceous note.
- 1 cup raw cashews (soaked 20 minutes) – The base for our creamy, dairy-free dip.
- ¼ cup nutritional yeast – Gives the dip that cheesy, umami flavor.
- 2 tablespoons lemon juice – For a touch of tanginess to cut through the richness.
- ½ teaspoon garlic powder – Extra garlic goodness for the dip!
- ½ teaspoon onion powder – Adds another layer of savory depth.
- ½ cup water – To blend the dip to the perfect smooth consistency.
- Salt and pepper, to taste – To season everything perfectly.
How to Make Garlic Dough Balls
Ready to create your own batch of these amazing bites? This Garlic Dough Balls simple recipe breaks it all down. Follow these steps, and you’ll have warm, fluffy, garlicky goodness in no time!
Making the Dough
First, let’s get our dough started. In a large bowl, combine the 3 ½ cups (440 g) strong white bread flour with the 2 teaspoons sugar, 2 teaspoons instant yeast, and 1 ½ teaspoons salt. Pour in the 1 ¼ cups (300 ml) warm water and 3 tablespoons olive oil. Mix everything together until a shaggy dough forms. Turn it out onto a lightly floured surface and knead for about 8 to 10 minutes until it’s wonderfully smooth and elastic. This kneading develops the gluten, which is key for that soft texture.
Shaping and Second Rise
Once your dough is beautifully smooth, place it into a lightly greased bowl. Cover it with a clean kitchen towel or plastic wrap and let it rise in a warm spot for about 1 hour, or until it has doubled in size. Gently punch down the risen dough. Now, divide it into 16 to 20 equal pieces. Roll each piece into a smooth ball. Arrange these dough balls on a parchment-lined baking tray, leaving a little space between them. Cover them again and let them rise for another 30 minutes. This second rise makes them extra puffy and light.
Baking and Garlic Butter Topping
While the dough balls are having their second rise, preheat your oven to 375°F (190°C). In a small bowl, melt the 3 tablespoons vegan butter and stir in the 4 minced garlic cloves and ½ teaspoon dried oregano or parsley. Once the dough balls have finished their second rise, brush them generously with this fragrant garlic butter mixture. Bake for 20 to 25 minutes, or until they are beautifully golden brown and smell amazing. As soon as they come out of the oven, give them another quick brush with the remaining garlic butter for maximum flavor and shine.
Preparing the Cheesy Cashew Dip
While the dough balls are baking, it’s time to whip up that irresistible cheesy dip. Drain your soaked cashews. Add them to a blender along with the ¼ cup nutritional yeast, 2 tablespoons lemon juice, ½ teaspoon garlic powder, ½ teaspoon onion powder, and ½ cup water. Season with salt and pepper to your liking. Blend until the mixture is completely smooth and creamy. If it’s too thick, add a tablespoon more water at a time until you reach your desired consistency. This dip is the perfect creamy, tangy companion to your warm garlic dough balls.
Pro Tips for the Best Garlic Dough Balls
Want to elevate your garlic dough balls from delicious to absolutely unforgettable? I’ve picked up a few tricks that make all the difference.
- Always use bread flour for the dough; it’s the secret to that incredibly light and fluffy texture.
- Don’t rush the rising times! Letting the dough rise properly is key to developing flavor and that signature soft chew.
- Brush the dough balls with the garlic butter mixture both *before* and *after* baking for maximum flavor infusion and a beautiful sheen.
- Serve the cheesy cashew dip warm; it makes it extra creamy and melty, enhancing the overall experience.
What’s the secret to perfect soft garlic dough balls?
The secret really lies in using bread flour and ensuring you don’t overwork the dough after the first rise. A gentle touch when shaping keeps them airy and light, making them the ultimate soft garlic dough balls.
Can I make Garlic Dough Balls ahead of time?
Yes, you can! You can prepare the dough and let it do its first rise, then punch it down and cover it in the fridge overnight. Shape them and let them come to room temperature before the second rise and baking, or bake from chilled and add a few extra minutes.
How do I avoid common mistakes with Easy Garlic Dough Balls Recipe?
A common pitfall is using water that’s too hot, which can kill the yeast. Ensure it’s just warm to the touch. Also, don’t over-bake them, or they’ll lose their soft texture. Keep an eye on them; they bake quickly!
Best Ways to Serve Garlic Dough Balls Appetizer
These warm, garlicky bites are incredibly versatile, making them perfect for all sorts of occasions. They truly shine as a standout Garlic Dough Balls appetizer at any party or gathering. I love serving them as a starter alongside a fresh green salad, which offers a nice contrast to their richness.
For a more substantial meal, consider pairing them with your favorite pasta dishes or hearty soups. They’re also fantastic for dipping! You’ll want to make sure you have plenty of that creamy Garlic Dough Balls dipping sauce on hand because people will be reaching for more. They’re ideal for Garlic Dough Balls for parties because they’re easy to share and always a crowd-pleaser.
Nutrition Facts for Garlic Dough Balls
Here’s a look at the nutritional breakdown for these delightful bites, based on one dough ball with a serving of the cheesy cashew dip.
- Calories: 160
- Fat: 7g
- Saturated Fat: 1g
- Protein: 5g
- Carbohydrates: 20g
- Fiber: 2g
- Sugar: 1g
- Sodium: 190mg
Nutritional values are estimates and may vary based on specific ingredients used.
How to Store and Reheat Garlic Dough Balls
Once your delicious Garlic Dough Balls have cooled down a bit, proper storage is key to keeping them tasting fresh. I usually let them cool completely before packing them away. For the best results, store any leftovers in an airtight container or wrap them tightly in plastic wrap. They’ll stay fresh in the refrigerator for about 3 to 4 days. If you want to keep them even longer, freezing is a great option!
To freeze, wrap individual dough balls tightly in plastic wrap, then place them in a freezer-safe bag or container. They can be kept in the freezer for up to 3 months. When you’re ready to reheat, you have a few options. For best results, remove them from the freezer and let them thaw in the refrigerator overnight. Then, you can warm them gently in the oven at around 300°F (150°C) for 5-10 minutes until heated through. You can also reheat from frozen in the oven, just add a few extra minutes to the baking time. Microwaving is quick, but can sometimes make them a bit chewier, so I prefer the oven method for the most tender results.
Frequently Asked Questions About Garlic Dough Balls
What are Garlic Dough Balls?
Garlic Dough Balls are essentially small, savory baked rolls that are infused with garlic flavor. Think of them as a more flavorful, often softer cousin to traditional garlic bread or garlic knots. They’re made from a simple yeast dough, then brushed with a garlic butter mixture and baked until golden. They’re a fantastic appetizer or side dish.
Are all Garlic Dough Balls vegan?
Not necessarily, but this recipe specifically features vegan ingredients, including vegan butter and a dairy-free cashew cheese dip. Many traditional recipes might use butter and cheese, but it’s easy to adapt them. My version is completely plant-based, making them accessible to everyone and a great option for parties with diverse dietary needs.
Can I use different herbs with Garlic Dough Balls?
Absolutely! While I love the classic combination of garlic and oregano or parsley, feel free to get creative. Chives, rosemary, or even a pinch of thyme can add a wonderful new dimension to your Garlic Dough Balls. Experimenting with herbs is a fantastic way to create your own signature flavor profile.
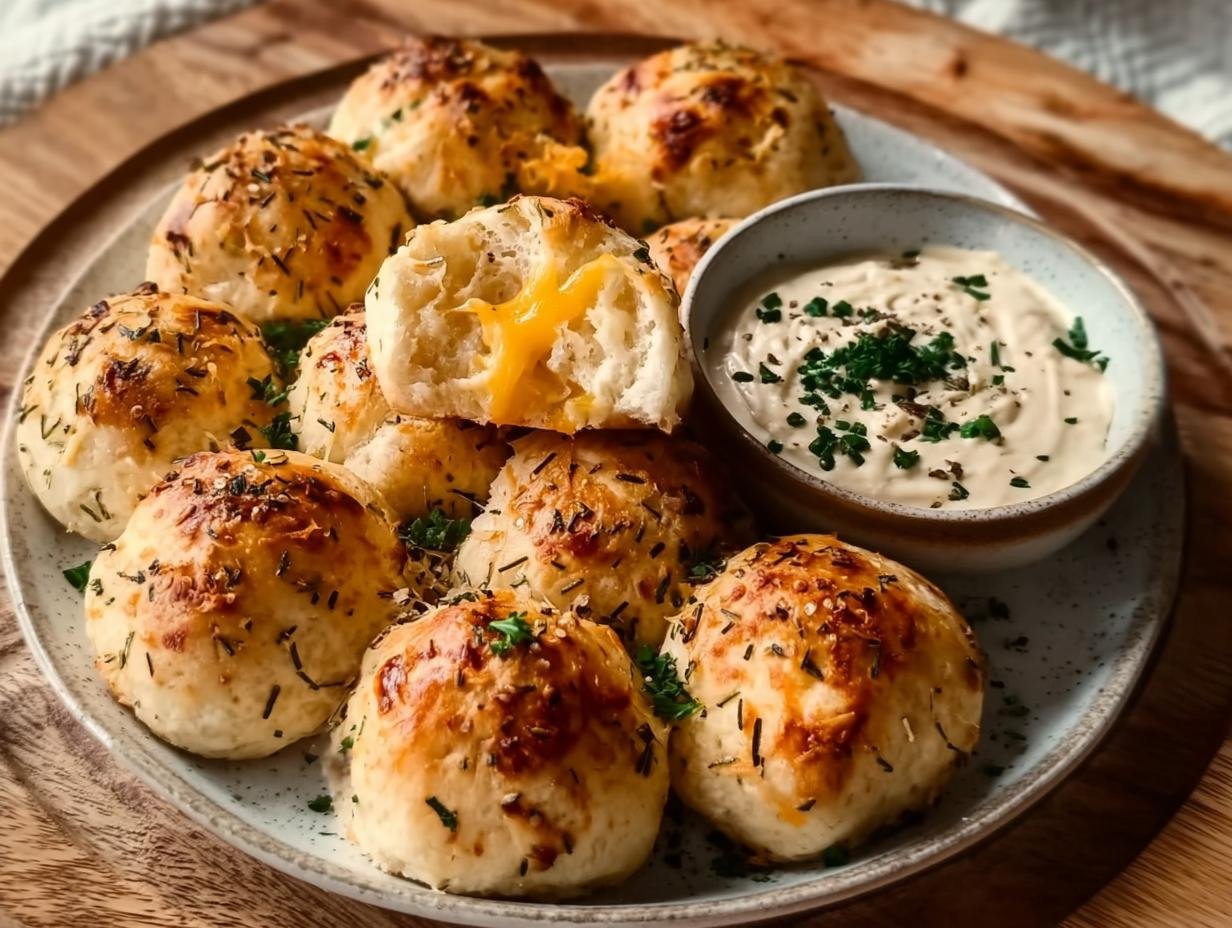
What makes these Garlic Dough Balls better than regular Garlic Bread Balls?
The key difference lies in the texture and presentation. These are distinctly “dough balls,” meaning they have a softer, chewier interior than a slice of garlic bread. The individual ball shape makes them perfect for dipping and easy to handle, especially for parties. Plus, the accompanying creamy cashew dip elevates them to a whole new level of deliciousness compared to standard garlic bread balls.
Variations of Garlic Dough Balls You Can Try
Once you’ve mastered the basic recipe, don’t be afraid to get creative with these delightful Garlic Dough Balls! There are so many ways to customize them to your taste and dietary needs. Experimenting is half the fun!
- Garlic Parmesan Dough Balls: For an extra savory kick, mix grated vegan Parmesan cheese into the dough before baking, or sprinkle some on top right after brushing with garlic butter. This adds a wonderful salty, cheesy depth.
- Garlic Herb Dough Balls: Feel free to play with your favorite herbs! Besides oregano and parsley, try adding finely chopped chives, rosemary, or thyme to the garlic butter topping for a fresh, aromatic twist. You can even mix some herbs into the dough itself.
- Air Fryer Garlic Dough Balls: Want them even quicker? You can absolutely make Air Fryer Garlic Dough Balls! Arrange them in a single layer in your air fryer basket (you might need to cook in batches) and air fry at 350°F (175°C) for about 8-10 minutes, or until golden brown.
- Spicy Garlic Dough Balls: Add a pinch of red pepper flakes to the garlic butter mixture for a subtle heat that complements the garlic beautifully.
Amazing Garlic Dough Balls: Irresistible Flavor

Irresistible Garlic Dough Balls with Cheesy Cashew Dip are warm, fluffy, garlicky, and dipped in creamy, dairy-free cheese, making them a perfect vegan party appetizer. These soft garlic dough balls are golden on the outside with a savory flavor inside, complemented by a silky-smooth, tangy, and rich cashew cheese sauce.
- Prep Time: 20 minutes (+90 minutes rise)
- Cook Time: 25 minutes
- Total Time: 1 hour 55 minutes
- Yield: 16 – 20 dough balls 1x
- Category: Appetizer
- Method: Baked
- Cuisine: Vegan
- Diet: Vegan
Ingredients
- For the Dough Balls:
- 3 ½ cups (440 g) strong white bread flour
- 2 teaspoons sugar
- 2 teaspoons instant yeast
- 1 ½ teaspoons salt
- 1 ¼ cups (300 ml) warm water
- 3 tablespoons olive oil
- For the Garlic Butter Topping:
- 3 tablespoons vegan butter, melted
- 4 garlic cloves, minced
- ½ teaspoon dried oregano or parsley
- For the Cheesy Cashew Dip:
- 1 cup raw cashews (soaked 20 minutes)
- ¼ cup nutritional yeast
- 2 tablespoons lemon juice
- ½ teaspoon garlic powder
- ½ teaspoon onion powder
- ½ cup water
- Salt and pepper, to taste
Instructions
- Make Dough: In a bowl, combine flour, sugar, yeast, and salt. Add warm water and olive oil. Mix into dough. Knead 8–10 minutes until smooth. Place in greased bowl, cover, and let rise 1 hour.
- Shape Dough Balls: Punch down dough, divide into 16–20 pieces, and roll into balls. Arrange on parchment-lined tray. Cover and let rise 30 minutes.
- Bake: Preheat oven to 375°F (190°C). Brush balls with melted vegan butter mixed with garlic and oregano. Bake 20–25 minutes until golden. Brush again after baking.
- Cashew Dip: Drain soaked cashews. Blend with nutritional yeast, lemon juice, garlic powder, onion powder, water, salt, and pepper until smooth.
- Serve: Enjoy warm garlic dough balls with cheesy cashew dip for dipping.
Notes
- Use bread flour for fluffier texture.
- Be patient with rising time for best results.
- Brush with garlic butter both before and after baking.
- Serve dip warm for melty, cheesy texture.
Nutrition
- Serving Size: 1 dough ball with dip
- Calories: 160
- Sugar: 1g
- Sodium: 190mg
- Fat: 7g
- Saturated Fat: 1g
- Unsaturated Fat: 6g
- Trans Fat: 0g
- Carbohydrates: 20g
- Fiber: 2g
- Protein: 5g
- Cholesterol: 0mg


Leave a Reply