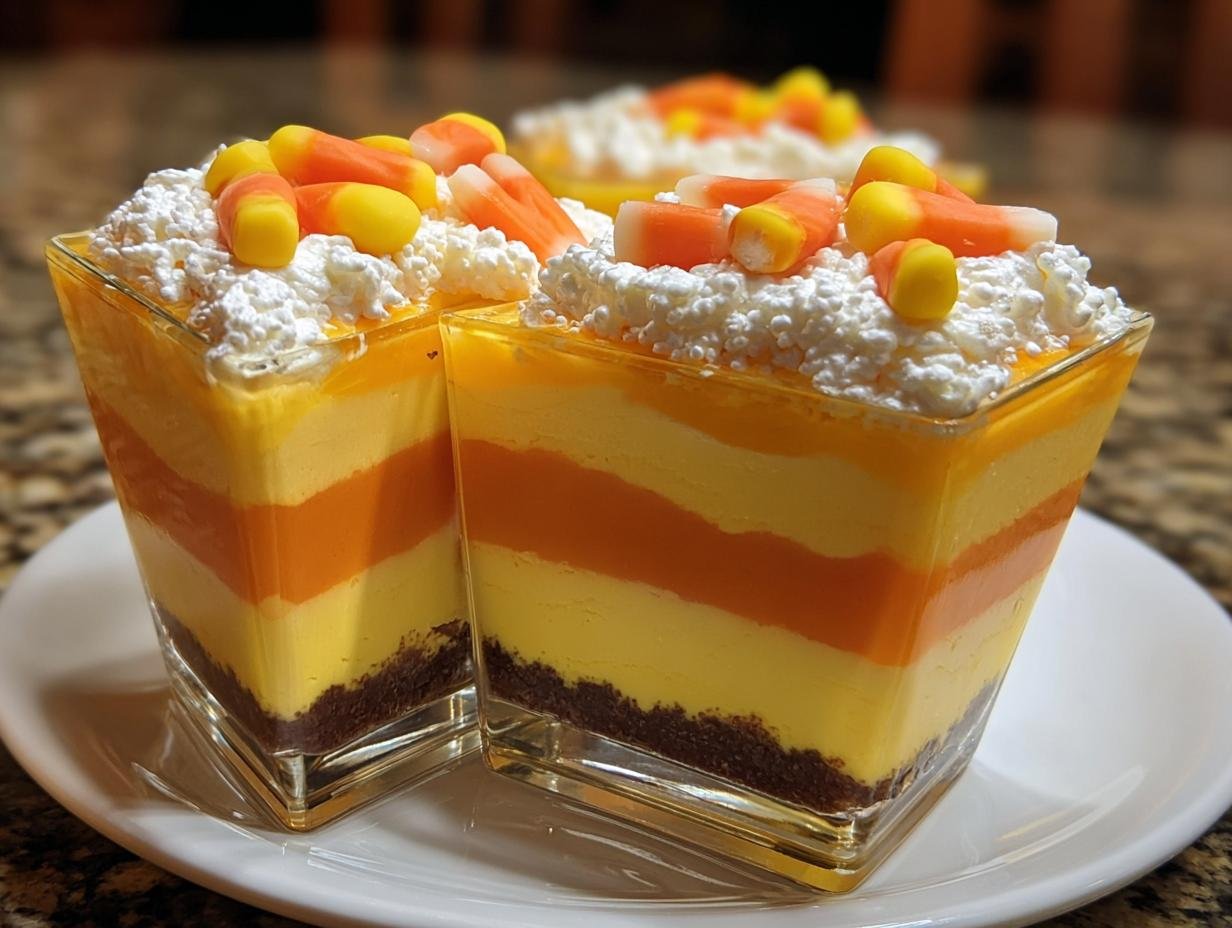
Candy Corn Layered Pudding has arrived to make your Halloween celebrations even more spectacular! This festive and fun dessert captures the iconic colors of candy corn with its vibrant orange and yellow layers, all nestled in a creamy pudding base. It’s a no-bake marvel, meaning you can whip it up with minimal fuss, making it the perfect treat for busy hosts. As a truly delightful layered candy corn dessert, it’s not only a feast for the eyes but also incredibly delicious. Its simple assembly and crowd-pleasing flavors make it ideal for any Halloween party, big or small. Let’s get cooking and create this enchanting sweet treat!
Why This Candy Corn Pudding Recipe is a Halloween Hit
This amazing candy corn pudding recipe is a guaranteed win for your Halloween festivities. Here’s why everyone loves it:
- Incredibly Easy to Make: Even if you’re new to baking, you can whip this up in minutes.
- Visually Stunning: The bright orange and yellow layers perfectly mimic candy corn, making it a festive centerpiece.
- A True Crowd-Pleaser: Kids and adults alike adore the creamy texture and sweet, familiar flavors.
- No-Bake Convenience: Forget the oven! This dessert is perfect for when you need a quick and easy treat.
- Highly Customizable: Feel free to swap out cookie bases or adjust the color intensity to your liking.
- Perfect for Parties: These easy candy corn pudding cups are portioned perfectly for guests at any Halloween gathering.
- Effortless Halloween Fun: Embrace the season with this delightful no-bake candy corn pudding that screams Halloween.
- Simple Ingredients: You likely already have most of what you need in your pantry!
Essential Ingredients for Candy Corn Layered Pudding
Gathering the right candy corn pudding ingredients is the first step to creating this delightful homemade candy corn pudding. You’ll need:
- 1 box (3.4 oz) vanilla instant pudding mix – This forms the creamy base of our dessert, setting quickly without cooking.
- 2 cups cold milk – Essential for activating the instant pudding mix and achieving the perfect creamy consistency.
- 1 cup crushed vanilla wafers – These create a delightful crunchy layer at the bottom, adding texture to your candy corn pudding layers.
- 1 cup orange gelatin powder – This is crucial for achieving that vibrant orange candy corn color and a slightly firmer texture in one of the layers.
- 1 cup whipped topping – For a light, airy finish, this adds a fluffy cloud-like topping to your dessert cups.
- 1/2 teaspoon yellow food coloring (gel-based) – Gel coloring is recommended for its intense pigment, allowing you to create a bright, true yellow layer without thinning the pudding.
- 1/4 cup candy corn pieces for garnish – The perfect finishing touch to really drive home the candy corn theme!
How to Make Candy Corn Pudding Layers
Ready to assemble your festive Halloween treat? Following these steps will guide you on how to make candy corn pudding that looks as amazing as it tastes. We’ll create those iconic candy corn pudding layers step-by-step!
- Step 1: First, prepare the vanilla pudding. In a medium bowl, whisk together the 1 box (3.4 oz) vanilla instant pudding mix with 2 cups cold milk. Continue whisking for about 2 minutes until the mixture thickens nicely.
- Step 2: Divide the thickened vanilla pudding evenly into two separate bowls. This is where the magic happens to create our distinct candy corn colors.
- Step 3: In one of the bowls, stir in the 1 cup orange gelatin powder. Mix until the powder is completely dissolved and you have a smooth, vibrant orange pudding mixture.
- Step 4: In the second bowl, gradually add the 1/2 teaspoon yellow food coloring (gel-based). Stir until you achieve a bright, cheerful yellow hue. Remember, gel coloring is potent, so add it slowly to get the perfect shade for your candy corn pudding layers.
- Step 5: Grab your clear dessert cups. Sprinkle a layer of the 1 cup crushed vanilla wafers into the bottom of each cup. This forms a delightful base for our colorful pudding.
- Step 6: Now, it’s time to create those beautiful candy corn pudding layers! Alternate spoonfuls of the orange pudding mixture and the yellow pudding mixture into the cups. Try to keep the layers distinct by carefully spooning them in.
- Step 7: Once your cups are filled with alternating layers of orange and yellow pudding, top each one with a generous dollop of the 1 cup whipped topping. This adds a lovely fluffy finish.
- Step 8: For the final festive touch, garnish the top of the whipped topping with a few 1/4 cup candy corn pieces. This truly makes it a show-stopping Halloween candy corn dessert.
- Step 9: Before serving your delicious candy corn pudding dessert cups, chill them in the refrigerator for at least 1 hour. This allows the layers to set properly and the flavors to meld together.
Pro Tips for the Best Candy Corn Parfait
Want to elevate your candy corn dessert game? Here are a few tricks I’ve picked up to make your candy corn parfaits truly spectacular:
- Always use clear dessert cups! It’s the best way to show off those vibrant candy corn pudding layers.
- Gel food coloring is your friend here. It gives you those intense orange and yellow hues without making your pudding too runny.
- Chilling your mixing bowls before you start can help the pudding thicken up even faster, which is great when you’re in a hurry.
- For an extra professional look, consider chilling the pudding mixtures for about 15-20 minutes before you start layering. This helps keep the colors from bleeding.
What’s the secret to perfect candy corn pudding layers?
The trick to those distinct, vibrant candy corn pudding layers is patience! Slightly chilling each pudding mixture before layering helps them hold their shape. Also, gently spooning the puddings in and using the back of the spoon to guide them in place makes a big difference. For more tips on creating visually appealing desserts, check out these tips on food presentation.
Can I make candy corn pudding dessert cups ahead of time?
Absolutely! You can assemble the pudding and wafer layers up to 2 days in advance and store them covered in the refrigerator. Just add the whipped topping and candy corn garnish right before serving to keep them looking their best.
How do I avoid common mistakes with candy corn pudding?
The most common issue is pudding that doesn’t thicken. Always use instant pudding mix and make sure your milk is very cold. If your colors start to bleed, it might be because the pudding is too warm; chilling it thoroughly before layering is key to keeping those beautiful candy corn pudding layers separate.
Best Ways to Serve Your Candy Corn Dessert
Presenting your delicious Halloween candy corn dessert is almost as fun as making it! The best way to serve these treats is in clear cups or glasses. This allows everyone to admire the beautiful, distinct orange and yellow candy corn pudding layers you worked so hard on. It truly enhances the visual appeal and makes them a standout at any gathering. These cups are perfect for candy corn pudding for parties, whether it’s a school event, a neighborhood get-together, or a family Halloween bash. You can also arrange them on a festive platter alongside other Halloween goodies like cookies or fruit for a complete dessert spread that will wow your guests! For other festive dessert ideas, consider these delicious dessert recipes.
Nutrition Facts for Candy Corn Layered Pudding
Here’s a look at the estimated nutritional content for each serving of our delightful candy corn pudding dessert cups:
- Calories: 280
- Fat: 9g
- Saturated Fat: 4g
- Protein: 3g
- Carbohydrates: 48g
- Fiber: 1g
- Sugar: 32g
- Sodium: 210mg
Nutritional values are estimates and may vary based on specific ingredients used in your homemade candy corn pudding. For information on healthy eating, you can refer to resources like the MyPlate website.
Storing and Reheating Your Halloween Pudding Cups
Properly storing your festive Halloween pudding cups ensures they stay delicious and visually appealing for your guests. After they’ve completely cooled, cover each cup tightly with plastic wrap or transfer them to an airtight container. This prevents them from absorbing odors in the refrigerator and keeps the whipped topping fresh. You can safely store these delightful candy corn pudding dessert cups in the fridge for up to 2 to 3 days. Since this is a no-bake treat, reheating isn’t necessary; in fact, they are best served chilled. Ensuring they stay cold is key to maintaining those beautiful, distinct candy corn pudding layers. For optimal enjoyment, always serve them cold, right from the refrigerator, following best practices for candy corn pudding cup recipe storage.
Frequently Asked Questions About Candy Corn Pudding
Can I use regular pudding mix for this candy corn pudding recipe?
While this recipe calls for instant pudding mix for quick thickening, you can use regular pudding mix if you have more time. Just be sure to follow the package directions for cooking it on the stovetop and allow it to cool completely before proceeding with the layering steps for your simple candy corn pudding.
Can I make this candy corn pudding sugar-free?
Yes, you absolutely can! To make a sugar-free version of this delightful candy corn pudding recipe, simply use a sugar-free vanilla instant pudding mix and swap the orange gelatin powder for a sugar-free orange gelatin option. You can also use a sugar-free whipped topping.
What other cookies can I use instead of vanilla wafers?
If you don’t have vanilla wafers on hand, or just want to switch things up, there are plenty of other great options for your simple candy corn pudding! Crushed graham crackers or shortbread cookies work wonderfully and add a slightly different flavor profile. Even crushed gingersnap cookies can add a lovely spice that complements the festive theme. For more cookie ideas, explore dessert cookie recipes.
How can I make the candy corn pudding layers more defined?
To get really sharp candy corn pudding layers, try chilling each pudding mixture for about 15-20 minutes after coloring them, before you start layering. This slightly firms them up. You can also use a piping bag or a Ziploc bag with a corner snipped off to carefully pipe the colors into the cups, which gives you more control.
Variations of Candy Corn Pudding Ideas
While the classic layered cups are fantastic, don’t stop there! Get creative with these fun candy corn pudding ideas. You can easily adapt this recipe for different occasions and tastes. Think about adding a rich chocolate pudding layer alongside the orange and yellow for a fun flavor twist. For a more decadent treat, consider making a large candy corn trifle recipe in a clear glass bowl, layering the pudding, cookies, and whipped topping in grand style.
You could also experiment with different cookie bases beyond vanilla wafers, like crushed graham crackers or even shortbread for a buttery note. Another idea is to create individual mini trifles in small jars for a charming presentation. The possibilities are endless for crafting your perfect candy corn dessert!
PrintCandy Corn Layered Pudding: Amazing 1-Hour Treat

A festive and easy layered pudding dessert resembling candy corn, perfect for Halloween parties. This no-bake treat features creamy pudding layers in iconic orange and yellow colors, topped with whipped cream and candy corn.
- Prep Time: 15 minutes
- Cook Time: 0 minutes
- Total Time: 1 hour 15 minutes
- Yield: 6 servings 1x
- Category: Dessert
- Method: No-Bake
- Cuisine: American
- Diet: Vegetarian
Ingredients
- 1 box (3.4 oz) vanilla instant pudding mix
- 2 cups cold milk
- 1 cup crushed vanilla wafers
- 1 cup orange gelatin powder
- 1 cup whipped topping
- 1/2 teaspoon yellow food coloring (gel-based)
- 1/4 cup candy corn pieces for garnish
Instructions
- Whisk vanilla pudding mix with cold milk until thickened, about 2 minutes. Divide the pudding evenly into two bowls.
- In one bowl, stir in the orange gelatin powder until fully dissolved to create the orange layer.
- In the other bowl, add yellow food coloring gradually until a bright yellow hue is achieved.
- Sprinkle a layer of crushed vanilla wafers at the bottom of clear dessert cups.
- Alternate spoonfuls of the orange and yellow pudding mixtures into the cups, creating distinct layers.
- Top each cup with a dollop of whipped topping.
- Garnish the top of each dessert cup with candy corn pieces.
- Chill the candy corn layered pudding cups in the refrigerator for at least 1 hour before serving.
Notes
- Using clear cups is recommended to showcase the colorful layers.
- Gel food coloring provides better vibrancy than liquid.
- Adjust the amount of yellow food coloring to achieve your desired shade.
- For a sugar-free option, use sugar-free pudding mix.
- Chilling the mixing bowls beforehand can help the pudding set faster.
- If desired, use graham crackers instead of vanilla wafers or add Halloween sprinkles.
- A splash of rum can be added for an adult version.
- These can be made ahead of time without the candy corn garnish and stored in the refrigerator for up to 2 days.
Nutrition
- Serving Size: 1 cup
- Calories: 280
- Sugar: 32g
- Sodium: 210mg
- Fat: 9g
- Saturated Fat: 4g
- Unsaturated Fat: 3g
- Trans Fat: 0g
- Carbohydrates: 48g
- Fiber: 1g
- Protein: 3g
- Cholesterol: 10mg


Leave a Reply