Canning Cranberry Juice has become one of my favorite kitchen rituals, especially as the holidays approach. I still remember the first time I tried to make my own; the vibrant red color and the tart, fresh aroma filled my kitchen, instantly transporting me back to crisp autumn days. Learning how to can cranberry juice at home was a game-changer, allowing me to capture that pure, unsweetened flavor to enjoy all year long. This simple process lets you preserve the goodness of cranberries, free from any added sugars or artificial ingredients. It’s incredibly satisfying to pull a jar of homemade cranberry juice from the pantry, knowing exactly what went into it. Let’s get cooking!
Why You’ll Love This Canning Cranberry Juice
There are so many fantastic reasons why canning cranberry juice will become your new favorite kitchen project. I’ve found it to be incredibly rewarding, and I think you will too!
- Pure, Unadulterated Flavor: This recipe captures the true, tangy essence of cranberries without any added sugar or artificial ingredients. It’s a taste of autumn in every sip.
- Health Benefits Galore: One of the major benefits of canning cranberry juice at home is knowing you’re getting all the antioxidants and goodness without any unwanted additives.
- Budget-Friendly: When cranberries are in season, they’re often affordable. Canning cranberry juice allows you to stock up and save money compared to store-bought options.
- Quick & Easy Prep: You’ll be surprised how little hands-on time this process takes, making it perfect for busy schedules.
- Versatile & Delicious: Use it as a refreshing drink, in cocktails, or as a base for sauces and jellies.
- Long-Lasting Goodness: Enjoy the vibrant taste of fresh cranberries for months, even a year or more, thanks to proper preservation. This is a huge benefit of canning cranberry juice.
Ingredients for Canning Cranberry Juice
Making your own canning cranberry juice requires just a few simple ingredients, allowing the pure flavor of the fruit to shine. I’ve found that keeping it minimal truly lets the cranberries speak for themselves.
- 4 pounds fresh or frozen cranberries – When it comes to the best cranberry varieties for canning, I usually opt for the common Early Black or Howes, but any firm, bright red cranberries will work beautifully. Fresh is ideal, but frozen works just as well if you can’t find fresh.
- 4 quarts water (divided, for boiling and dilution) – This is essential for both simmering the cranberries to extract their juice and for diluting it to your preferred strength.
- Optional: ¼ cup natural sweetener (like honey or stevia) per quart after canning – I prefer to can mine unsweetened, so I always recommend waiting to add any sweetener until you’re ready to serve. This gives you more versatility with your delicious canning cranberry juice.
How to Make Canning Cranberry Juice
Making your own pure cranberry juice canning recipe is a straightforward and rewarding process. I love the simple steps involved, and the result is incredibly satisfying. Follow this DIY Cranberry Juice Canning Tutorial to preserve that vibrant cranberry goodness!
- Step 1: First, prepare your cranberries. Give them a good rinse under cool water, picking out any stems or soft, bruised berries. Place the cleaned cranberries into a large stockpot. Pour in enough water to completely cover the cranberries; this helps them soften evenly.
- Step 2: Bring the water and cranberries to a boil over high heat. Once boiling, reduce the heat to a gentle simmer. Let them simmer for about 10 minutes, or until the cranberries begin to pop open and release their beautiful color and flavor. You’ll notice the water turning a lovely ruby red.
- Step 3: Carefully pour the entire cranberry mixture through a fine-mesh strainer or a colander lined with several layers of cheesecloth into another large pot or bowl. Gently press the cranberries with the back of a spoon to extract as much juice as possible, but avoid pressing too hard, as this can make your juice cloudy. This is a crucial part of the DIY Cranberry Juice Canning Tutorial for clear juice.
- Step 4: Return the extracted cranberry juice to the stockpot. Heat the juice just below boiling; you’ll see small bubbles forming around the edges but it shouldn’t be a rolling boil. While the juice is heating, ensure your canning jars are sterilized and warm.
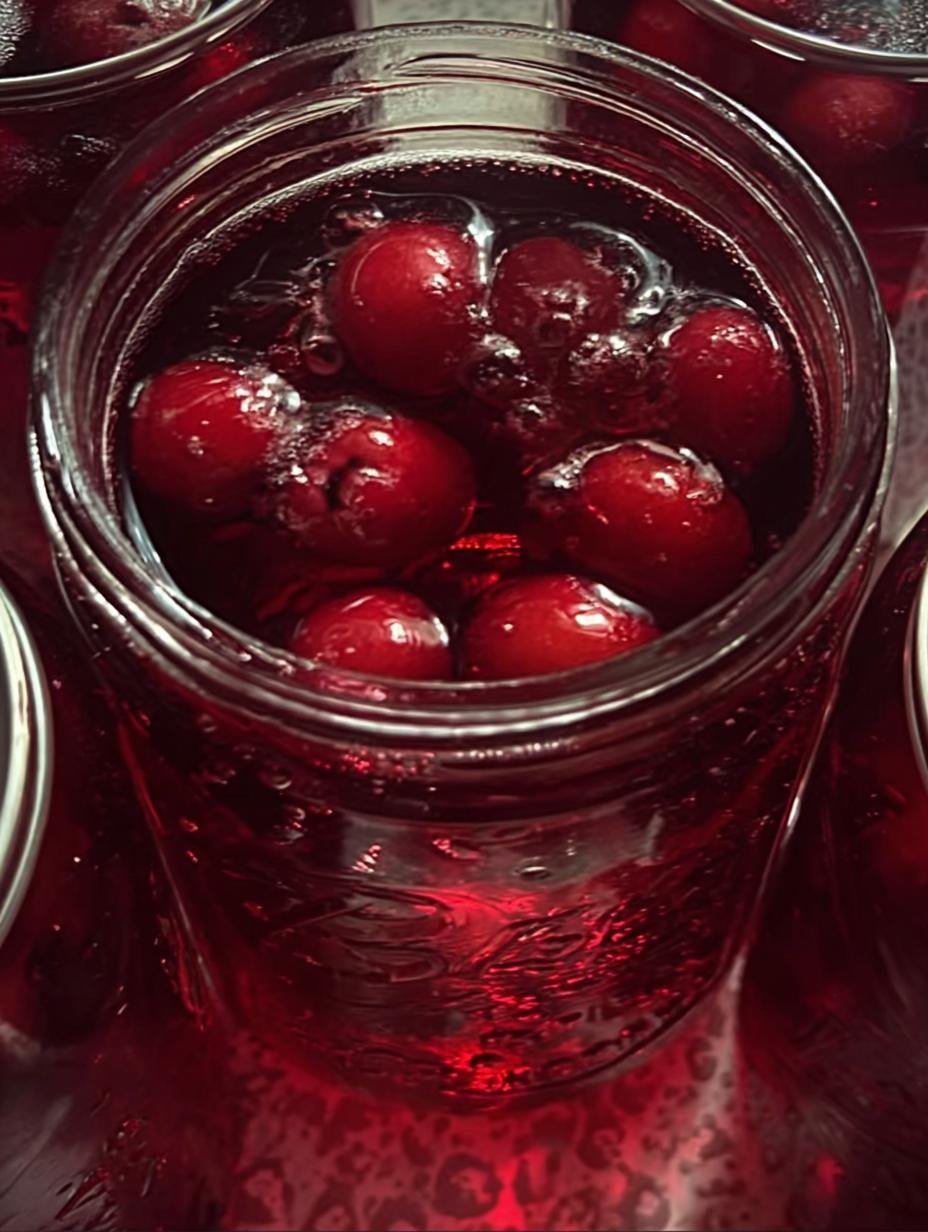
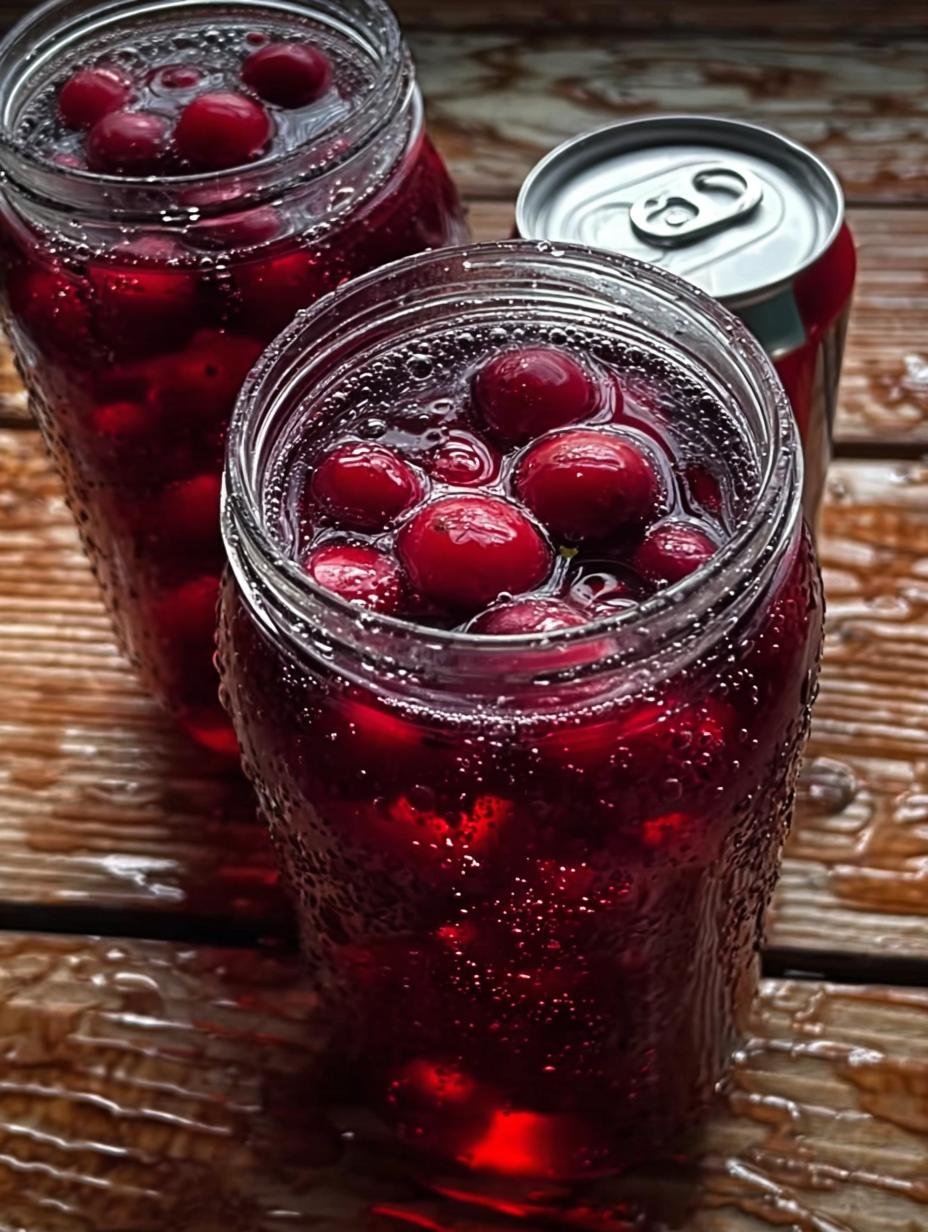
- Step 5: Carefully ladle the hot juice into your sterilized mason jars, leaving 1/2 inch of headspace at the top. This headspace is vital for proper sealing. Wipe the rims of the jars thoroughly with a clean, damp cloth to remove any drips. Center the lids on the jars and apply the bands fingertip-tight.
- Step 6: Place the filled jars into a boiling water canner, ensuring they are fully submerged by at least 1 inch of water. Bring the water back to a full boil and process the jars for 15 minutes. If you’re at a higher altitude, remember to adjust your processing time accordingly.
- Step 7: Once the processing time is complete, turn off the heat and carefully remove the jars from the canner using a jar lifter. Place them on a towel-lined surface, ensuring they are not touching each other, and allow them to cool completely for 12-24 hours. You’ll hear satisfying “pings” as the jars seal. After cooling, check all seals; lids should be concave and not flex when pressed. Store your beautiful canning cranberry juice in a cool, dark place.
Pro Tips for the Best Canning Cranberry Juice
I’ve learned a few tricks over the years that truly elevate your homemade canning cranberry juice from good to absolutely fantastic. These expert tips will help you achieve the best flavor and shelf stability every time.
- Always use ripe, firm cranberries. Avoid any that are soft or discolored, as they can affect the final taste and quality of your juice.
- Don’t over-press the cranberries when straining. A gentle press is enough to extract the juice without introducing cloudy pulp into your clear liquid.
- Ensure your jars and lids are properly sterilized and hot before filling. This is crucial for safe preserving cranberry juice and achieving a good seal.
- Adjust processing times for your altitude. Skipping this step can compromise the safety and shelf life of your beautifully bottled juice.

What’s the secret to perfect Homemade Cranberry Juice Preservation?
The real secret to flawless homemade cranberry juice preservation lies in not overcooking the cranberries initially. Gently simmering just until they pop releases the juice without extracting too much pectin, ensuring a clear, vibrant liquid. This approach is key when making cranberry juice for canning.
Can I make Canning Fresh Cranberry Juice ahead of time?
Absolutely! You can prepare the cranberry juice (steps 1-3) a day or two in advance. Store the strained juice in the refrigerator. When you’re ready to proceed with canning fresh cranberry juice, simply reheat it to just below boiling before ladling into jars.
How do I avoid common mistakes with Canning Cranberry Juice?
To avoid common mistakes when canning cranberry juice, always ensure you have the correct headspace in your jars and that your lids are applied fingertip-tight. Over-tightening can prevent proper sealing, as can insufficient processing time. Always verify seals after cooling.
Best Ways to Serve Canning Cranberry Juice
Once you’ve gone through the rewarding process of canning cranberry juice, you’ll find countless delicious ways to enjoy your homemade bounty. I love its versatility, making it perfect for any occasion.
For a refreshing, everyday drink, simply dilute your pure canning cranberry juice with still or sparkling water to taste. A squeeze of fresh lime or a sprig of mint elevates it beautifully. It’s also fantastic as a base for vibrant cocktails or mocktails, pairing wonderfully with gin, vodka, or even just a splash of ginger ale. The natural tartness of your home-bottled juice shines through without being overly sweet.
Don’t limit yourself to just beverages! This juice is excellent for culinary uses too. I often use it to deglaze pans for a pan sauce with chicken or turkey, adding a lovely tang. You can also reduce it slightly to create a glaze for roasted vegetables or a delicious topping for yogurt and oatmeal. The beauty of bottling cranberry juice yourself is having this pure flavor ready whenever inspiration strikes.
Nutrition Facts for Canning Cranberry Juice
I’m always curious about the nutritional content of what I make, and this pure canning cranberry juice is a wonderfully healthy option. Here’s what you can expect per serving (this recipe yields 4 quarts, making approximately 16 one-cup servings):
- Calories: 40
- Sugar: 4g
- Sodium: 2mg
- Fat: 0g
- Saturated Fat: 0g
- Unsaturated Fat: 0g
- Trans Fat: 0g
- Carbohydrates: 10g
- Fiber: 1g
- Protein: 0g
- Cholesterol: 0mg
Nutritional values are estimates and may vary based on specific ingredients used and how much pulp might be included from the cranberry juice canning process.
How to Store and Reheat Canning Cranberry Juice
Proper storage is essential for enjoying your homemade canning cranberry juice for months to come. After your jars have sealed and cooled completely, wipe them clean and label them with the date. I always make sure mine are clearly marked!
For unsealed jars (those that didn’t “ping” or have a lid that flexes), refrigerate them immediately and consume the juice within 3-4 days. This ensures freshness and safety. For successful long-term storage of cranberry juice, place your properly sealed jars in a cool, dark, and dry pantry or cellar. Stored this way, your beautiful cranberry juice will retain its quality for up to 18 months.
Once a jar is opened, it must be refrigerated. I find it stays fresh for about 7-10 days in the fridge. If you prefer to warm your cranberry juice, simply pour the desired amount into a saucepan and gently heat it over low to medium heat until it reaches your preferred temperature. Avoid boiling, as this can diminish its fresh flavor.
Frequently Asked Questions About Canning Cranberry Juice
What is the best way to can cranberry juice?
For home canners, the water bath method is generally considered the best way to can cranberry juice. Since cranberries are high in acid, they are safe for water bath canning. This method ensures proper sterilization and creates a vacuum seal, making your homemade cranberry juice shelf-stable for long periods. I find it to be a very reliable and straightforward process for canning cranberry juice.
Do I need to sterilize my jars before canning cranberry juice?
Yes, absolutely! Sterilizing jars for cranberry juice is a critical safety step. While the hot water bath will sterilize the jars during processing, starting with sterilized jars, especially if your processing time is less than 10 minutes (which is not the case for this recipe but good to know), is always recommended. It helps eliminate any bacteria that could compromise the juice’s safety and shelf life. I always make sure my jars are sparkling clean and hot before filling.
Can I can cranberry juice with sugar?
While this recipe focuses on unsweetened juice, you can certainly add sugar if you prefer. However, it’s generally recommended to add sugar when serving rather than before canning. Adding sugar before canning can sometimes affect the juice’s clarity or require adjustments to processing times, depending on the amount. For pure canning cranberry juice, I prefer to keep it sugar-free and sweeten individual servings to taste.
How long does canned cranberry juice last?
When properly canned using the water bath method and stored in a cool, dark place, your homemade canning cranberry juice can last for up to 18 months. Once a jar is opened, it should be refrigerated and consumed within 7-10 days. Always check for proper seals before storing and consuming. A good seal means the lid is concave and doesn’t flex when pressed.
Variations of Canning Cranberry Juice You Can Try
While I adore the simplicity of this pure canning cranberry juice recipe, sometimes it’s fun to experiment with different flavors or methods. Here are a few creative variations you might enjoy, all adaptable for the reliable water bath canning cranberry juice method.
For a spiced twist, consider adding a few cinnamon sticks or a star anise to the cranberries during the initial simmer. This infuses the juice with a warm, aromatic flavor perfect for the holidays. Just remember to remove the spices before canning. Another delicious option is blending cranberries with other fruits. I’ve had great success with apple-cranberry juice or even orange-cranberry, which adds a lovely sweetness and complexity. Simply process the additional fruit along with the cranberries.
If you’re looking for a concentrate, you can simmer the juice longer after straining to reduce it further before canning. This creates a more intense flavor that can be diluted significantly when serving. All these variations can be safely preserved using the same water bath canning cranberry juice steps, ensuring you have a diverse selection of homemade beverages for any occasion.
PrintCanning Cranberry Juice: 1 Secret for Incredible Flavor
Canning Cranberry Juice Without Sugar is the perfect way to preserve the crisp, tangy flavor of fresh cranberries all year long. This easy, two-ingredient recipe creates a pure, ruby-red juice that’s naturally tart, antioxidant-rich, and free from refined sugars or additives. It’s simple to make, shelf-stable for over a year, and makes a beautiful homemade Christmas gift for friends and family.
- Prep Time: 15 minutes
- Cook Time: 25 minutes
- Total Time: 40 minutes
- Yield: 4 quarts 1x
- Category: Beverage, Canning, Holiday Gifts
- Method: Canning
- Cuisine: American
- Diet: Vegan
Ingredients
- 4 pounds fresh or frozen cranberries
- 4 quarts water (divided, for boiling and dilution)
- Optional for a milder flavor: ¼ cup natural sweetener (like honey or stevia) per quart after canning
Instructions
- Prepare the cranberries: Rinse cranberries well, discarding stems and soft berries. Add to a large stockpot and pour in enough water to cover completely.
- Simmer until soft: Bring to a boil, then reduce heat and simmer for 10 minutes, until cranberries pop and release color and flavor.
- Strain the juice: Pour mixture through a fine-mesh strainer or cheesecloth. Press gently to extract liquid but avoid cloudiness.
- Reheat and prepare jars: Return juice to the pot and heat just below boiling. Ladle into sterilized mason jars, leaving ½ inch headspace. Wipe rims and apply lids fingertip-tight.
- Process in a water bath: Place jars in boiling water bath and process for 15 minutes (adjust for altitude). Remove carefully and cool on a towel-lined surface until sealed.
- Cool and store: Listen for the “pop” to confirm sealing. Store sealed jars in a cool, dark place for up to 18 months.
Notes
- For stronger flavor, simmer juice longer to make a cranberry concentrate before canning.
- Do not sweeten before canning — add natural sweeteners when serving if desired.
- Always sterilize jars and process for full time to ensure safety.
- Use leftover cranberry pulp for sauces, chutneys, or baking.
- Store sealed jars at room temperature; refrigerate after opening and consume within 7–10 days.
Nutrition
- Serving Size: 1 cup
- Calories: 40
- Sugar: 4g
- Sodium: 2mg
- Fat: 0g
- Saturated Fat: 0g
- Unsaturated Fat: 0g
- Trans Fat: 0g
- Carbohydrates: 10g
- Fiber: 1g
- Protein: 0g
- Cholesterol: 0mg


Leave a Reply