Chili Garlic Chicken Pizza has become my ultimate comfort food, a dish that perfectly marries my love for bold, spicy flavors with the undeniable joy of a cheesy pizza. I first stumbled upon this idea while trying to clear out my fridge, combining leftover chili garlic sauce with some chicken and a store-bought crust. The aroma that filled my kitchen was incredible – a mix of pungent garlic, fiery chili, and savory chicken. The first bite was an explosion of taste, instantly transporting me to a happy place. This isn’t just any pizza; it’s a truly unique experience. You’ll love how easy it is to make this homemade chili garlic chicken pizza, creating a restaurant-quality meal right in your own kitchen. Let’s get cooking!
Why You’ll Love This Chili Garlic Chicken Pizza
I genuinely believe this pizza will become a new favorite in your home. Here are just a few reasons why I adore making and eating this incredible dish:
- The flavor profile is unbelievably delicious, offering a perfect balance of savory, spicy, and tangy notes in every bite.
- It’s surprisingly easy to prepare, making it a fantastic weeknight meal that comes together without much fuss.
- This spicy garlic chicken pizza is a crowd-pleaser, perfect for family dinners or entertaining friends who appreciate bold flavors.
- You get to control the spice level, making it as mild or as fiery as you desire.
- It’s a more exciting and flavorful alternative to your usual pizza night, bringing an exotic twist to a classic.
- Making your own spicy garlic chicken pizza at home is often more budget-friendly than ordering takeout, and it tastes so much better!
Ingredients for Chili Garlic Chicken Pizza
Gathering the right Chili Garlic Chicken Pizza ingredients is the first step to creating this flavor-packed masterpiece. I’ve broken it down to make your shopping list simple and clear:
- 1 ½ cups warm water (105-115°F or 40-46°C) – crucial for activating the yeast in your dough.
- 2 teaspoons active dry yeast – the magic behind a fluffy crust.
- 1 teaspoon granulated sugar – feeds the yeast, helping your dough rise.
- 3 ½ – 4 cups all-purpose flour – plus a little extra for dusting your workspace.
- 2 tablespoons olive oil – and extra for greasing your bowl; adds flavor and tenderness.
- 1 ½ teaspoons fine sea salt – essential for seasoning the dough.
- 1 ½ pounds boneless, skinless chicken thighs – I prefer thighs for their juiciness, but breasts sliced thin also work well.
- 3 tablespoons soy sauce (low sodium preferred) – for that umami depth in the chicken marinade.
- 4 cloves garlic, minced very finely – a cornerstone of the chili garlic flavor profile.
- 1 teaspoon red chili flakes – adjust this to your preferred heat level for a truly spicy garlic chicken pizza.
- 1 tablespoon brown sugar or honey – balances the heat and acidity in the marinade and sauce.
- 2 prepared pizza dough balls – homemade from the recipe or your favorite store-bought option.
- 2 cups low-moisture mozzarella cheese, freshly shredded – for the perfect melt and stretch.
- ½ medium red onion, thinly sliced – adds a nice bite and color.
- ¼ cup fresh cilantro, chopped – for a bright, fresh finish.
How to Make Chili Garlic Chicken Pizza
Get ready to create a truly unforgettable pizza experience right in your own kitchen! Making chili garlic chicken pizza at home is a rewarding process, and I’ll walk you through each step to ensure your success. Pay attention to the details, and you’ll be enjoying a slice of heaven in no time.
- Step 1: First things first, prepare your dough. In a large bowl, combine warm water, sugar, and yeast. Let this mixture sit for 5-10 minutes until it becomes foamy, indicating the yeast is active. Then, stir in 1.5 cups of flour, 2 tablespoons of olive oil, and the sea salt. Gradually add the remaining flour until a shaggy dough forms.
- Step 2: Turn the dough out onto a lightly floured surface and knead it for 7-10 minutes until it’s smooth and elastic. I always find this part so therapeutic! Place the kneaded dough in an oiled bowl, cover it with plastic wrap or a clean kitchen towel, and let it rise in a warm spot for 1-1.5 hours, or until it has doubled in size. Once risen, gently punch it down, divide it into two balls, cover them, and let them rest for another 15-20 minutes. This resting period makes the dough easier to work with.
- Step 3: While your dough is rising, let’s prepare the star of our pizza: the chicken. In a bowl, whisk together 2 tablespoons of olive oil, 4 cloves of finely minced garlic, chopped red chilies (or red pepper flakes), soy sauce, honey, rice vinegar, and sesame oil. Add your chicken pieces, making sure each one is thoroughly coated in this delicious marinade. Let it marinate for at least 30 minutes; I often let mine sit for 2-4 hours, or even overnight in the refrigerator, for maximum flavor. This step is key to a truly flavorful chili garlic chicken pizza.
- Step 4: Heat 1 tablespoon of olive oil in a skillet over medium-high heat. Add the marinated chicken in a single layer, making sure not to overcrowd the pan. You might need to cook it in batches. Sear for 3-5 minutes per side until the chicken is golden brown and cooked through. The smell at this stage is absolutely incredible! Remove the chicken from the skillet, let it rest briefly, then dice it into bite-sized pieces if you haven’t already.
- Step 5: Now, for the delicious chili garlic sauce. In a medium saucepan, heat 1 tablespoon of olive oil over medium heat. Sauté 8 cloves of minced garlic and 2 teaspoons of red chili flakes for 1-2 minutes until they become wonderfully fragrant. Stir in the tomato paste and cook for another 2-3 minutes, allowing its flavor to deepen. Add the passata or crushed tomatoes and chicken broth. Incorporate Sriracha or Gochujang (if using), brown sugar or honey, rice vinegar, and soy sauce. Season with salt and pepper to your taste. Simmer this sauce, uncovered, for 15-20 minutes, stirring occasionally, until it has slightly thickened. Finally, stir in the fresh lime juice and set the sauce aside. This homemade sauce is what truly elevates your homemade chili garlic chicken pizza.
- Step 6: Preheat your oven to a scorching 475-500°F (245-260°C). If you have a pizza stone or steel, place it in the oven during preheating for at least 30-60 minutes to ensure a perfectly crispy crust. Dust a pizza peel or a piece of parchment paper with semolina or flour. Take one of your rested dough balls and gently shape it into a 12-14 inch circle, leaving a slight border for the crust. Carefully transfer the shaped dough to your prepared peel or parchment.
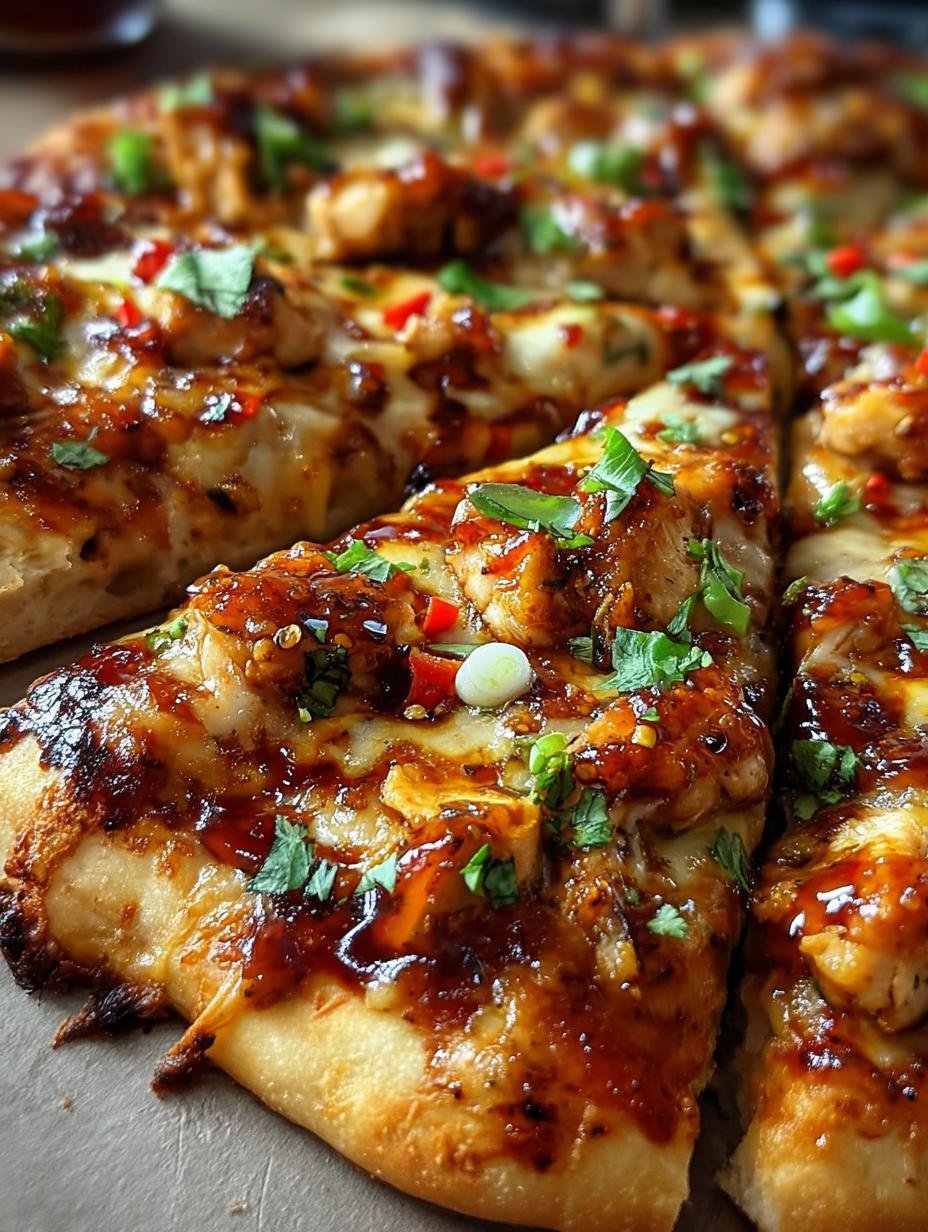
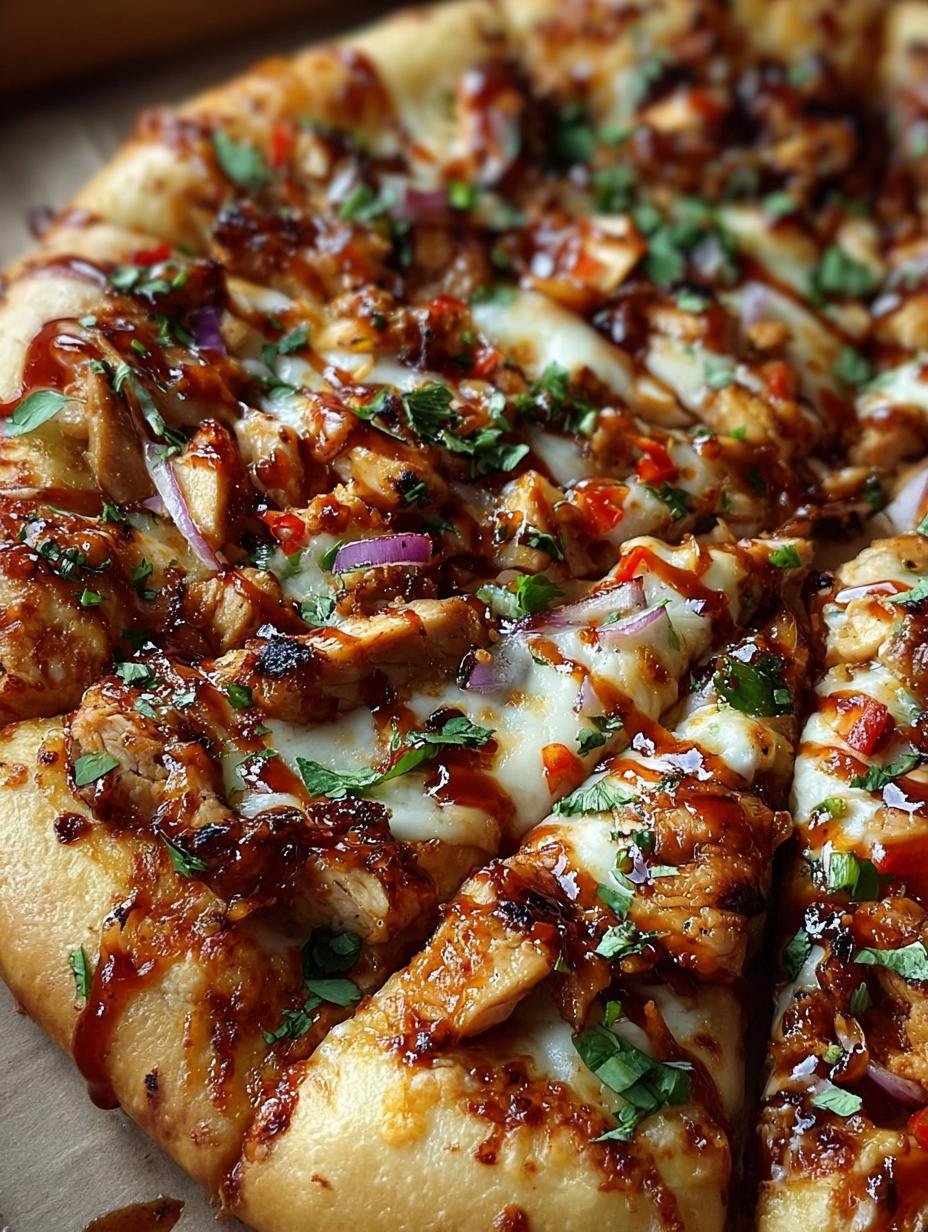
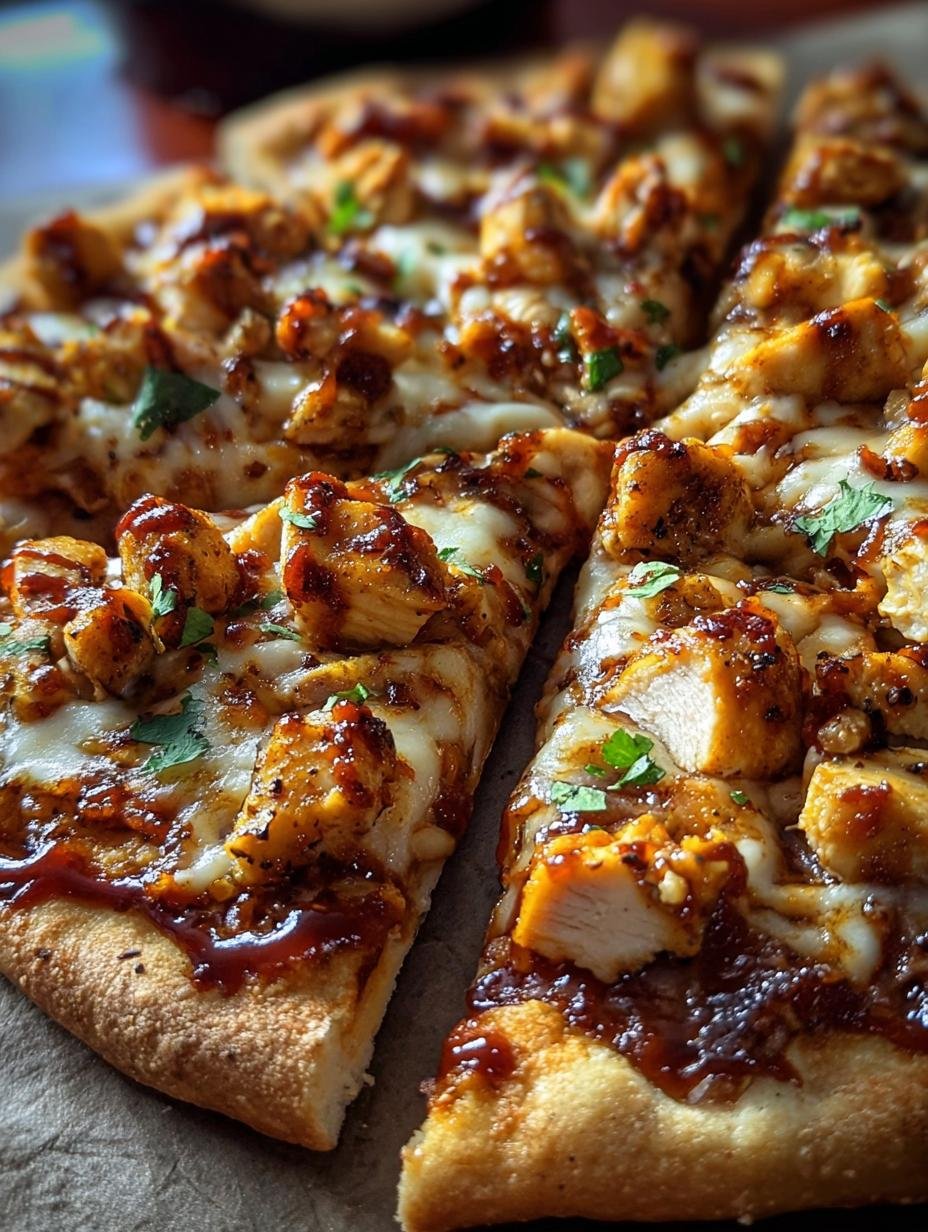
- Step 7: Spread a generous layer of your homemade chili garlic sauce over the dough, leaving that border untouched. Top with a lavish amount of mozzarella and provolone (if using), followed by your perfectly cooked chicken, thinly sliced red onion, and optional jalapeños. Slide your pizza onto the hot baking surface in the oven. Bake for 10-15 minutes, or until the crust is beautifully golden brown and the cheese is bubbly and lightly charred. This is the exciting part of making chili garlic chicken pizza at home!
- Step 8: Carefully remove the pizza from the oven and transfer it to a cutting board. Let it rest for 2-3 minutes before slicing – this helps the cheese set and prevents toppings from sliding off. Garnish generously with fresh chopped cilantro. For an extra touch, drizzle with a little honey or chili oil. Serve immediately with a crisp green salad or a cold beverage and savor every bite of your incredible creation.
Pro Tips for the Best Chili Garlic Chicken Pizza
I’ve learned a few tricks over the years that truly elevate this Chili Garlic Chicken Pizza from great to absolutely phenomenal. These simple pro tips will ensure your pizza crust is perfectly crispy, your chicken is bursting with flavor, and your sauce hits all the right notes every single time.
- Always preheat your oven with a pizza stone or steel for at least 30-60 minutes. This creates a super hot surface that cooks the bottom of the crust quickly, resulting in that desirable crispy base.
- Don’t overcrowd your skillet when cooking the chicken. Giving the chicken enough space allows it to sear beautifully and develop a rich, caramelized crust, which adds so much depth to your spicy garlic chicken pizza.
- Taste your chili garlic sauce as it simmers and adjust seasonings. Sometimes a little extra brown sugar can balance the heat, or a splash more vinegar can brighten the flavors. Trust your palate!
- Let your pizza rest for 2-3 minutes after baking before slicing. This allows the cheese to set and prevents all those delicious toppings from sliding off when you cut into it.
What’s the secret to perfect Chili Garlic Chicken Pizza?
The real secret lies in the balance of flavors in the chili garlic sauce and the deeply marinated chicken. Using both fresh and cooked garlic, along with a mix of chili flakes and Sriracha, creates layers of spicy, savory goodness. This is how you achieve that truly exceptional homemade chili garlic chicken pizza.
Can I make Chili Garlic Chicken Pizza ahead of time?
Absolutely! You can prepare the chicken and the chili garlic pizza sauce up to 2-3 days in advance and store them in airtight containers in the refrigerator. This makes assembling your Chili Garlic Chicken Pizza on pizza night incredibly quick and easy. Just make fresh dough!
How do I avoid common mistakes with Chili Garlic Chicken Pizza?
To avoid common pitfalls, don’t overwork your pizza dough; a light touch keeps it tender. Also, ensure your oven is fully preheated for a crispy crust. Finally, don’t skip the marinating step for the chicken, as it’s key to infusing that amazing chili garlic flavor throughout your Chili Garlic Chicken Pizza.
Best Ways to Serve Chili Garlic Chicken Pizza
Once your incredible Chili Garlic Chicken Pizza emerges from the oven, bubbling and fragrant, you might be tempted to devour it immediately. And honestly, I wouldn’t blame you! However, pairing it with the right sides can elevate the entire meal experience. I love serving this bold pizza with something that offers a refreshing contrast, balancing out the rich, spicy flavors.
A crisp, simple green salad with a light vinaigrette is always my go-to. The fresh greens and tangy dressing cut through the richness of the chicken pizza with chili garlic beautifully. Another fantastic option is a cool cucumber salad, perhaps with a hint of rice vinegar and sesame oil, which complements the Asian-inspired notes in the pizza. For those who enjoy a little extra crunch, some light and airy spring rolls or even a simple bowl of edamame make excellent companions. Don’t forget a cold beverage, like sparkling water with lime or a light lager, to complete your perfect pizza night!
Nutrition Facts for Chili Garlic Chicken Pizza
For those curious about the nutritional breakdown of this delicious dish, I’ve put together some estimates. This Chili Garlic Chicken Pizza packs a flavorful punch, and it’s good to know what you’re fueling your body with. Per serving, assuming 8 slices per pizza, here’s a general idea:
- Calories: 500
- Protein: 30g
- Fat: 25g
- Saturated Fat: 10g
- Carbohydrates: 50g
- Fiber: 3g
- Sugar: 15g
- Sodium: 800mg
Please remember that these nutritional values are estimates and may vary based on specific ingredients, brands, and portion sizes used in your homemade Chili Garlic Chicken Pizza.
How to Store and Reheat Chili Garlic Chicken Pizza
I know it’s hard to imagine having leftovers of this amazing Chili Garlic Chicken Pizza, but sometimes it happens! Proper storage is key to enjoying your pizza later. First, ensure your pizza has cooled completely to room temperature before storing. This prevents sogginess and keeps the crust crisp.
For short-term storage, place individual slices or larger portions in an airtight container or wrap them tightly in plastic wrap, then foil. Your Chili Garlic Chicken Pizza will stay fresh in the refrigerator for 3-4 days. For longer storage, you can freeze individual slices for up to 3 months. Just wrap each slice well in plastic wrap, then foil, to prevent freezer burn.
When it comes to reheating, I highly recommend avoiding the microwave if you want to maintain that delicious crispy crust. The best way to reheat your Chili Garlic Chicken Pizza is in the oven or an air fryer. Preheat your oven to 350°F (175°C) and bake for 8-10 minutes, or until the cheese is bubbly and the crust is crisp. An air fryer at 325°F (160°C) for 3-5 minutes also works wonders for a quick and crispy reheat.
Frequently Asked Questions About Chili Garlic Chicken Pizza
Can I make the pizza dough from scratch for this recipe?
Absolutely! The recipe actually includes instructions for making homemade pizza dough, which I highly recommend for the best flavor and texture. It adds a little extra time, but the effort is truly worth it for a fresh, chewy crust. If you’re wondering how to cook chili garlic chicken pizza from start to finish, mastering the dough is a fantastic first step.
What if I don’t have fresh ginger or Sriracha?
Don’t worry if you’re missing an ingredient! For fresh ginger, you can use about half a teaspoon of ground ginger powder in a pinch, though the fresh flavor is superior. If Sriracha isn’t available, you can increase the red chili flakes slightly or add a dash of your favorite hot sauce for that extra kick. The key is to balance the flavors to your liking when learning how to cook chili garlic chicken pizza.
How can I make my Chili Garlic Chicken Pizza spicier?
If you love heat, there are several ways to crank it up! You can increase the amount of red chili flakes in both the chicken marinade and the sauce. Adding extra fresh sliced jalapeños or even some serrano peppers as a topping will also boost the spice. A drizzle of chili oil after baking is another fantastic way to add a fiery finish to your Chili Garlic Chicken Pizza.
Can I use a different type of cheese for Chili Garlic Chicken Pizza?
While mozzarella and provolone offer that classic pizza melt, feel free to experiment! Smoked gouda could add a lovely smoky depth, or a touch of Monterey Jack could enhance the creaminess. I’ve even seen people add a sprinkle of cotija cheese for a salty, tangy kick. Adjusting the cheese is a great way to personalize your Chili Garlic Chicken Pizza experience.
Variations of Chili Garlic Chicken Pizza You Can Try
One of the best things about making your own Chili Garlic Chicken Pizza is the freedom to get creative with it! I love experimenting with different flavors and textures to keep things exciting. Here are a few variations you can try to customize this delicious dish to your liking:
- Vegetarian Twist: Easily transform this into a meat-free delight. Instead of chicken, use pan-fried extra-firm tofu or tempeh marinated in the same chili garlic sauce. You can also load up on extra vegetables like bell peppers, mushrooms, or spinach as your primary Chili Garlic Chicken Pizza toppings.
- Smoky BBQ Fusion: For a different flavor profile, try swapping out half of the chili garlic sauce for a smoky BBQ sauce. Marinate the chicken in a blend of chili garlic and BBQ flavors, then top your pizza with red onions, a combination of mozzarella and smoked gouda, and a sprinkle of fresh cilantro.
- Pineapple Power: If you’re a fan of pineapple on pizza, this might be your new favorite! The sweetness of pineapple chunks perfectly complements the spicy and savory notes of the Chili Garlic Chicken Pizza. Add them along with your chicken and cheese before baking for a delightful tropical kick.
- Spicy Shrimp Delight: For seafood lovers, substitute the chicken with marinated shrimp. Quickly sauté the shrimp until just pink, then add them as a topping. The chili garlic flavors pair wonderfully with the delicate sweetness of the shrimp, creating a gourmet twist.
Ultimate Chili Garlic Chicken Pizza: 1 Amazing Meal
Experience an extraordinary culinary adventure with this Chili Garlic Chicken Pizza, where tender chicken coated in a fiery, aromatic chili garlic sauce meets crispy crust and gooey melted cheese. A satisfying, easy-to-prepare dish combining bold Asian-inspired flavors with a beloved Italian classic.
- Prep Time: 15 Minutes
- Cook Time: 40 Minutes
- Total Time: 1 Hour 55 Minutes
- Yield: 2 (12-14 inch) pizzas 1x
- Category: Pizza
- Method: Baking
- Cuisine: Italian-Asian Fusion
- Diet: Halal
Ingredients
- 1 ½ cups warm water (105-115°F or 40-46°C)
- 2 teaspoons active dry yeast
- 1 teaspoon granulated sugar
- 3 ½ – 4 cups all-purpose flour, plus more for dusting
- 2 tablespoons olive oil, plus extra for greasing
- 1 ½ teaspoons fine sea salt
- 1 ½ pounds boneless, skinless chicken thighs (or breasts, sliced thin)
- 2 tablespoons olive oil (for marinade)
- 3 tablespoons soy sauce (low sodium preferred)
- 2 tablespoons rice vinegar
- 4 cloves garlic, minced very finely
- 1 tablespoon fresh ginger, grated
- 1 teaspoon red chili flakes (adjust to your heat preference)
- 1 tablespoon brown sugar or honey
- ½ teaspoon freshly ground black pepper
- 1 tablespoon olive oil (for sauce)
- 8 cloves garlic, minced
- 2 teaspoons red chili flakes (for sauce)
- 2 tablespoons tomato paste
- 1 (15 ounce) can passata or crushed tomatoes
- ½ cup chicken or vegetable broth
- 1 tablespoon Sriracha or Gochujang (optional, for extra depth and kick)
- 1 tablespoon brown sugar or honey (for sauce)
- 1 tablespoon rice vinegar (for sauce)
- 1 tablespoon soy sauce (low sodium preferred, for sauce)
- Salt and freshly ground black pepper, to taste
- 1 tablespoon fresh lime juice
- 2 prepared pizza dough balls (from recipe above, or store-bought)
- 2 cups low-moisture mozzarella cheese, freshly shredded
- ½ cup provolone cheese, freshly shredded (optional)
- ½ medium red onion, thinly sliced
- ¼ cup fresh cilantro, chopped (for garnish)
- 1–2 jalapeños, thinly sliced (optional)
- A drizzle of honey or chili oil, for serving (optional)
Instructions
- In a large bowl, combine warm water, sugar, and yeast; let foam for 5-10 minutes. Mix in 1.5 cups flour, 2 tablespoons olive oil, and salt. Gradually add remaining flour until a shaggy dough forms. Knead on a floured surface for 7-10 minutes until smooth. Place in an oiled bowl, cover, and let rise in a warm place for 1-1.5 hours until doubled. Punch down, divide into two balls, cover, and rest for 15-20 minutes.
- In a bowl, whisk together 2 tablespoons olive oil, 4 cloves minced garlic, chopped red chilies (or red pepper flakes), soy sauce, honey, rice vinegar, and sesame oil. Add chicken cubes, ensuring they are well coated. Marinate for at least 30 minutes, preferably 2-4 hours or overnight in the refrigerator.
- Heat 1 tablespoon olive oil in a skillet over medium-high heat. Add marinated chicken in a single layer (cook in batches if needed). Sear for 3-5 minutes per side until golden brown and cooked through. Remove, rest, then dice into bite-sized pieces if not already.
- In a medium saucepan, heat 1 tablespoon olive oil over medium heat. Sauté 8 cloves minced garlic and 2 teaspoons red chili flakes for 1-2 minutes until fragrant. Stir in tomato paste and cook 2-3 minutes. Add passata/crushed tomatoes and broth. Incorporate Sriracha/Gochujang (if using), brown sugar/honey, rice vinegar, and soy sauce. Season with salt and pepper. Simmer, uncovered, for 15-20 minutes, stirring occasionally, until slightly thickened. Stir in fresh lime juice; set aside.
- Preheat oven to 475-500°F (245-260°C) with a pizza stone/steel or inverted baking sheet for 30-60 minutes. Dust a pizza peel or parchment paper with semolina/flour. Shape one dough ball into a 12-14 inch circle, leaving a crust border. Transfer to peel/parchment. Spread chili garlic sauce over dough, leaving a border. Top with mozzarella, provolone (if using), cooked chicken, sliced red onion, and optional jalapeños. Slide pizza onto the hot baking surface. Bake 10-15 minutes, until crust is golden brown and cheese is bubbly and lightly charred.
- Carefully remove pizza from oven and transfer to a cutting board. Let rest for 2-3 minutes before slicing. Garnish generously with fresh chopped cilantro. Drizzle with honey or chili oil if desired. Serve immediately with a crisp green salad or cold beverage. Reheat leftovers in an oven or air fryer for best results.
Notes
- For the pizza dough, make sure your warm water is between 105-115°F (40-46°C) to properly activate the yeast.
- Marinating the chicken for a longer period (2-4 hours or overnight) will result in more tender and flavorful chicken for your chili garlic chicken pizza.
- Do not overcrowd the pan when cooking the chicken; cook in batches to ensure proper searing and browning.
- When making the chili garlic pizza sauce, cook the tomato paste for 2-3 minutes to deepen its flavor.
- Simmer the sauce for at least 15-20 minutes to allow flavors to meld and the sauce to thicken.
- Preheating your oven with a pizza stone or steel for 30-60 minutes is crucial for a crispy pizza crust.
- Let the pizza rest for 2-3 minutes after baking before slicing to prevent toppings from sliding off.
- Customize your chili garlic chicken pizza with additional toppings like bell peppers, mushrooms, or pineapple.
- Adjust the amount of red chili flakes and jalapeños to your preferred spice level for this spicy garlic chicken pizza.
- For best reheating results, use an oven or air fryer to maintain the crispy crust.
Nutrition
- Serving Size: 1 slice (assuming 8 slices per pizza)
- Calories: 500
- Sugar: 15g
- Sodium: 800mg
- Fat: 25g
- Saturated Fat: 10g
- Unsaturated Fat: 12g
- Trans Fat: 0g
- Carbohydrates: 50g
- Fiber: 3g
- Protein: 30g
- Cholesterol: 70mg


Leave a Reply