
Protein Pop Tarts Guilt has been a real thing for me, ever since I was a little kid sneaking those sugary treats. I used to devour them, but as an adult, the thought of all that sugar and processed ingredients always left me with a heavy feeling. That’s why I’ve discovered this incredible recipe for healthy Pop Tart alternatives that completely eliminates the shame! My kitchen now fills with the warm, comforting scent of fresh-baked pastry and berries, a smell that brings pure joy, not regret. This recipe is a game-changer for anyone looking for nutritious Pop Tart options without the usual remorse. Let’s get cooking!
Why You’ll Love This Protein Pop Tarts Recipe
I know you’re going to adore these homemade protein pop tarts as much as I do! They’re a fantastic solution for anyone seeking healthy Pop Tart alternatives that don’t compromise on flavor or satisfaction. My recipe transforms a nostalgic treat into a nutritious option, completely removing the Protein Pop Tarts Guilt I used to feel. Here’s why these will become your new favorite:
- Incredible Taste: You won’t believe these are good for you! They taste just like the classic, but better.
- Quick Prep Time: My recipe is designed to be efficient, making them perfect for busy mornings.
- Health Benefits: Packed with protein and wholesome ingredients, they keep you full and energized.
- Guilt-Free Indulgence: Finally, guilt-free Pop Tart recipes that actually deliver on their promise.
- Budget-Friendly: Making them at home saves money compared to store-bought options.
- Family-Friendly: Even my pickiest eaters ask for these, making breakfast a breeze.
- Customizable: Easily adapt fillings and glazes to suit your taste or dietary needs.
Ingredients for Guilt-Free Protein Pop Tarts
To banish any lingering Protein Pop Tarts Guilt, I’ve carefully selected ingredients that are both delicious and nutritious. This list is your roadmap to creating a fantastic, healthier breakfast or snack. You’ll find everything you need to build a flaky pastry, a vibrant fruit filling, and a sweet protein glaze.
- 1 ½ cups (180g) all-purpose flour – or a 1:1 gluten-free baking blend for a GF option, ensuring a tender crust.
- ½ cup (60g) vanilla or unflavored whey protein powder – this is key for boosting the protein content in your pastry.
- ¼ cup (50g) erythritol or granular sweetener of choice – for guilt-free sweetness.
- ½ teaspoon baking powder – helps with the pastry’s lift and texture.
- ¼ teaspoon salt – balances the flavors beautifully.
- 6 tablespoons (85g) unsalted butter, very cold and cut into small cubes – crucial for achieving that flaky texture in your protein pastry.
- ¼ cup (60ml) ice-cold water – plus 1-2 tablespoons more if needed, essential for a pliable dough.
- 1 teaspoon vanilla extract – adds a lovely aroma and flavor to the dough.
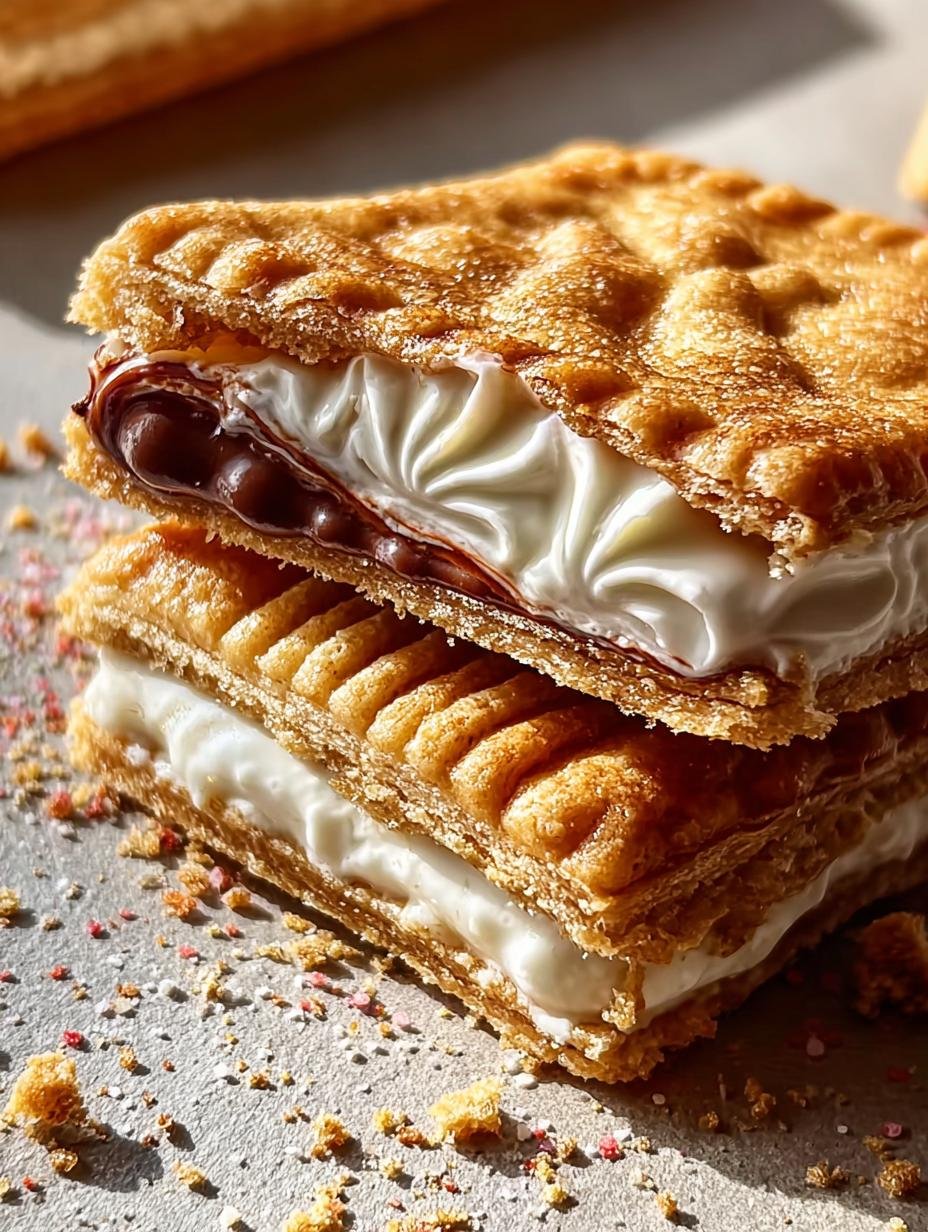
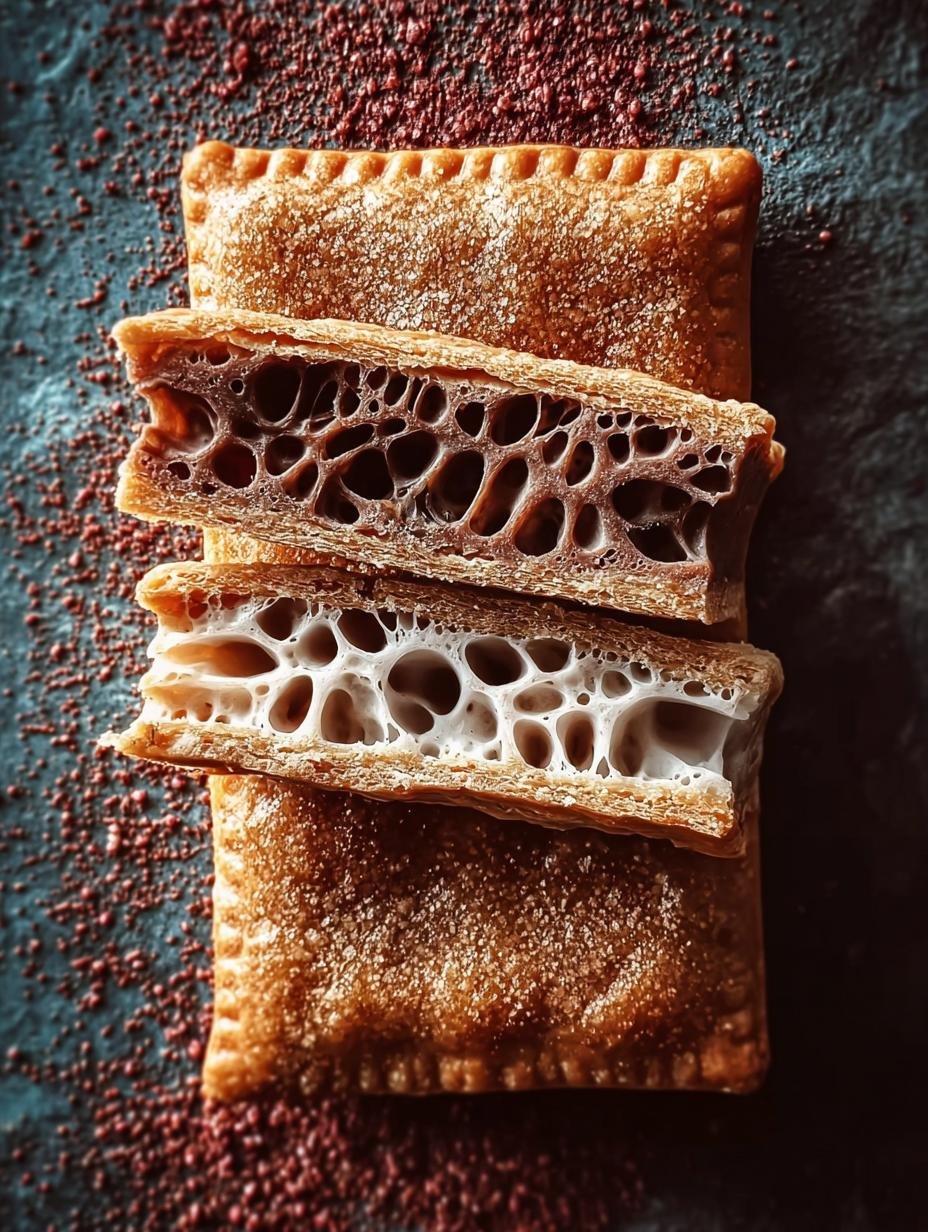
- 1 cup (240g) mixed berries – fresh or frozen, like raspberries and blueberries, for a burst of natural fruitiness.
- 2 tablespoons (30g) vanilla or berry-flavored protein powder – (casein or whey) for the filling, making these truly high-protein breakfast pastries.
- 1 tablespoon chia seeds – acts as a natural thickener and adds healthy fats.
- 1-2 tablespoons (15-30ml) water or almond milk – as needed for the filling consistency.
- 1 tablespoon (15ml) maple syrup or honey – optional, for a touch more sweetness in the filling.
- ½ teaspoon lemon juice – brightens the fruit filling’s flavor.
- ½ cup (60g) powdered erythritol or sugar-free powdered sweetener – for the protein glaze.
- 2 tablespoons (30g) vanilla or unflavored protein powder – (whey or casein) for a firm, protein-packed glaze.
- 2-3 tablespoons (30-45ml) almond milk or water – to achieve the perfect glaze consistency.
- ¼ teaspoon vanilla extract – for the glaze.
- A tiny pinch of salt – enhances the glaze’s sweetness.
- Optional: Food coloring or sprinkles – for a fun, decorative touch.
How to Make Protein Pop Tarts
Making these delightful Protein Pop Tarts is a fun and rewarding process! I’ll guide you through each phase, from preparing the flaky dough to glazing your finished treats. Follow these steps closely for the best results, and you’ll soon be enjoying your very own homemade protein Pop Tart recipes.
- Step 1: Preheat your oven to 375°F (190°C). Line a large baking sheet with parchment paper, preparing for your delicious creations.
- Step 2: In a large bowl, whisk together the all-purpose flour, protein powder, erythritol, baking powder, and salt. Make sure it’s well combined to avoid any clumps in your pastry.
- Step 3: Add the very cold, cubed unsalted butter to the dry ingredients. Use a pastry blender or your fingertips to cut the butter into the flour mixture until it resembles coarse crumbs with pea-sized pieces. Speed is key here to keep the butter cold, which ensures a flaky texture.
- Step 4: In a separate small bowl, combine ice-cold water and vanilla extract. Gradually add this liquid to the flour mixture, stirring with a fork until the dough just starts to come together. Add more ice water if needed, a tablespoon at a time, until a cohesive ball forms. Avoid overmixing to keep the pastry tender.
- Step 5: Gently shape the dough into a disk, flatten it slightly, wrap it tightly in plastic wrap, and refrigerate for at least 30 minutes. This chilling process is essential for relaxing the gluten and firming up the butter, setting the stage for perfect homemade protein Pop Tart recipes.
- Step 6: While the dough chills, prepare your fruit and protein filling. In a small saucepan, combine mixed berries, two tablespoons of water (or almond milk), and optional maple syrup. Simmer over medium heat for 5-7 minutes until the berries soften and break down.
- Step 7: Remove from heat and stir in the protein powder, chia seeds, and lemon juice. Mix thoroughly. The chia seeds will thicken the mixture as it cools, creating a rich filling for your Protein Pop Tarts. Allow it to cool for 10-15 minutes.
- Step 8: Retrieve the chilled dough. On a lightly floured surface or between two sheets of parchment paper, roll out the dough into a large rectangle, about 1/8 to 1/4 inch thick (roughly 12×16 inches). Trim the edges to create a neat rectangle.
- Step 9: Cut the large rectangle into 8 smaller, even rectangles (approximately 3×4 inches each), yielding 4 complete pop tarts. This is where your vision for delicious homemade protein Pop Tart recipes starts to take shape!
- Step 10: Spoon 1-2 tablespoons of the cooled berry-protein filling onto the center of four dough rectangles, leaving a ½-inch clear border around the edges. Don’t overfill, or it might leak during baking.
- Step 11: Place the remaining four dough rectangles on top of the filled ones, carefully aligning the edges. Press down around the edges with your fingertips to seal them. Then, firmly crimp all around the edges with a fork for that classic pop tart look and to securely seal the filling inside.
- Step 12: Poke a few small holes in the top of each pop tart with a fork or skewer. This allows steam to escape during baking, preventing puffing or cracking.
- Step 13: Transfer the assembled Protein Pop Tarts to your prepared baking sheet. Bake for 15-20 minutes, or until the edges are golden brown and the pastry is cooked through. Keep a close eye on them to prevent over-browning.
- Step 14: Remove from the oven and transfer to a wire rack to cool completely. This crucial step allows the pastry to firm up and the filling to set properly before glazing. Let them cool for at least 30 minutes.
Pro Tips for the Best Protein Pop Tarts
I’ve learned a few tricks over time that truly elevate these Protein Pop Tarts from good to absolutely amazing. These expert tips will help you achieve that perfect balance of flaky pastry and flavorful filling every single time, making your homemade treats stand out. Trust me, these small adjustments make a big difference in the final product.
- Always ensure your butter and water are ice-cold when making the dough; this is fundamental for a flaky, tender pastry.
- Avoid overworking the dough at all costs. Overmixing develops gluten too much, leading to a tough rather than delicate pastry.
- Don’t overfill your pop tarts! A little less filling is better than a messy leak during baking.
- Let the pop tarts cool completely before glazing. This prevents the glaze from melting and running off, keeping your treats looking pristine.
- Experiment with different protein powder flavors in both the dough and the glaze to customize your taste experience.
What’s the secret to perfect Protein Pop Tarts?
The real secret lies in keeping your butter and water extremely cold during dough preparation. This creates tiny pockets of steam during baking, resulting in a wonderfully flaky and tender protein pastry without guilt. It’s a fundamental technique for achieving that melt-in-your-mouth texture.
Can I make Protein Pop Tarts ahead of time?
Absolutely! You can prepare and assemble the unbaked Protein Pop Tarts, then refrigerate them on a baking sheet, covered, for up to 24 hours. Alternatively, bake them fully, let cool, and store in an airtight container. They’re a fantastic make-ahead option for busy mornings.
How do I avoid common mistakes with Protein Pop Tarts?
To avoid common pitfalls, first, don’t overmix the dough; a light hand ensures tenderness. Second, seal the edges thoroughly with a fork to prevent filling leakage. Finally, ensure your Protein Pop Tarts are completely cool before drizzling with glaze to prevent a runny mess.
Best Ways to Serve Protein Pop Tarts
Once your delicious Protein Pop Tarts are cooled and glazed, you might be wondering how best to enjoy them. I find they’re incredibly versatile, perfect for a quick breakfast or a satisfying snack. Here are my favorite ways to serve these delightful high-protein breakfast pastries.
For a fantastic start to your day, I love pairing a warm Protein Pop Tart with a side of Greek yogurt and a handful of fresh berries. The extra protein from the yogurt complements the pastry perfectly. It creates a balanced and filling meal that keeps me energized throughout the morning.
Another great option is to enjoy them with a hot cup of coffee or a protein shake. The subtle sweetness and flaky texture of the pastry are a wonderful match for your favorite morning beverage. For a more indulgent treat, a scoop of sugar-free vanilla ice cream makes for a surprisingly good accompaniment, turning these into a guilt-free dessert!
Nutrition Facts for Protein Pop Tarts
I know many of you are curious about the nutritional breakdown of these amazing Protein Pop Tarts Guilt-free treats. I’ve calculated the approximate values per serving to help you track your intake. You’ll be pleased to see how well these fit into a balanced diet, offering a significantly healthier alternative to traditional Pop Tarts.
- Serving Size: 1 pop tart
- Calories: 415
- Protein: 25g
- Fat: 16g
- Saturated Fat: 9g
- Unsaturated Fat: 7g
- Trans Fat: 0g
- Carbohydrates: 48g
- Fiber: 4g
- Sugar: 16g
- Sodium: 180mg
- Cholesterol: 35mg
Nutritional values are estimates and may vary based on specific ingredients and brands used. I always aim for the most accurate information to help you enjoy your Protein Pop Tarts with confidence.
How to Store and Reheat Protein Pop Tarts
Once you’ve baked a batch of these delicious Protein Pop Tarts, you’ll want to make sure they stay fresh so you can enjoy them for days to come! Proper storage is key to maintaining their texture and flavor. After they’ve completely cooled on a wire rack, which is crucial for preventing sogginess, I recommend storing them in an airtight container.
You can keep them at room temperature for up to 3 days, but for extended freshness, pop them in the refrigerator for up to a week. If you’re a meal prepper like me, these Nutritious Pop Tart options are also freezer-friendly! Simply wrap individual unglazed tarts tightly in plastic wrap, then place them in a freezer-safe bag or container for up to 3 months. When ready to enjoy, thaw them overnight in the fridge.
To reheat, I usually warm them gently in a toaster oven or air fryer at 300°F (150°C) for 5-10 minutes until heated through, or microwave for 30-60 seconds for a quick treat. If frozen, reheat from thawed. This ensures they regain that lovely warm, flaky texture.
Frequently Asked Questions About Protein Pop Tarts
Are protein Pop Tarts healthy?
Yes, my homemade Protein Pop Tarts are designed to be a significantly healthier alternative to their store-bought counterparts. I’ve focused on using whole ingredients, reducing added sugars, and boosting the protein content with protein powder. This makes them a more nutritious choice for breakfast or a snack, helping you feel good about what you’re eating.
What are the benefits of protein Pop Tarts?
The benefits of my Protein Pop Tarts are numerous! Primarily, they offer a substantial protein boost, which helps with satiety and muscle maintenance. They also provide fiber from the fruit and chia seeds, supporting digestive health. Plus, by making them yourself, you control the ingredients, avoiding artificial flavors, colors, and excessive sugars often found in commercial versions. It’s a delicious way to enjoy a classic treat without the usual guilt.
Can I use different types of protein powder?
Absolutely! I’ve found that vanilla or unflavored whey protein powder works best for the dough and glaze due to its texture and mixability. For the filling, casein protein powder can also be excellent as it tends to thicken more. You can experiment with different flavors, but always ensure the type you choose blends well without making the dough or glaze gritty.
How do these compare to store-bought Pop Tarts nutritionally?
My Protein Pop Tarts are a game-changer compared to store-bought versions. Traditional Pop Tarts are typically high in sugar, unhealthy fats, and lack significant protein or fiber. My recipe drastically reduces sugar, increases protein and fiber, and uses better-for-you fats. This results in a more balanced, satisfying, and blood-sugar-friendly treat that aligns with a healthy lifestyle, effectively banishing any Protein Pop Tarts Guilt.
Variations of Protein Pop Tarts You Can Try
One of the best things about making these Protein Pop Tarts at home is the endless possibilities for customization! I love experimenting with different flavors and dietary considerations. Here are a few variations I’ve tried that keep things exciting and ensure you always have delicious clean eating Pop Tarts on hand, without any guilt.
- Chocolate Hazelnut Dream: For a decadent twist, swap the berry filling for a homemade chocolate hazelnut spread made with cocoa powder, hazelnut butter, and a touch of protein powder. This creates a rich, satisfying flavor profile for your clean eating Pop Tarts.
- Savory Spinach & Feta: Who says Pop Tarts have to be sweet? For a savory option, fill your pastry with sautéed spinach, crumbled feta cheese, and a pinch of garlic powder. Adjust the dough by reducing the sweetener slightly.
- Tropical Mango Coconut: Blend fresh mango with a touch of coconut extract and protein powder for a tropical filling. Top with a coconut milk-based glaze. This is a bright and refreshing take on the classic.
- Gluten-Free & Vegan Options: Easily convert this recipe by using a 1:1 gluten-free baking blend for the flour and a plant-based butter alternative. Opt for a vegan protein powder (like pea or brown rice protein) in both the dough and filling to make delicious vegan clean eating Pop Tarts.
Protein Pop Tarts Guilt: Banish 1 Shameful Regret Now

Enjoy a guilt-free breakfast or snack with this innovative Protein Pop Tarts Recipe. It features a warm, soft pastry with a delightful fruit filling, offering a smart blend of indulgence and daily protein intake.
- Prep Time: 45 Minutes
- Cook Time: 20 Minutes
- Total Time: 1 Hour 5 Minutes
- Yield: 4 pop tarts 1x
- Category: Breakfast, Snack
- Method: Baking
- Cuisine: American
- Diet: Vegetarian
Ingredients
- For the Protein Pastry Dough:
- 1 ½ cups (180g) all-purpose flour (or a 1:1 gluten-free baking blend for a GF option)
- ½ cup (60g) vanilla or unflavored whey protein powder
- ¼ cup (50g) erythritol or granular sweetener of choice
- ½ teaspoon baking powder
- ¼ teaspoon salt
- 6 tablespoons (85g) unsalted butter, very cold and cut into small cubes (or a plant-based butter alternative for dairy-free)
- ¼ cup (60ml) ice-cold water, plus 1-2 tablespoons more if needed
- 1 teaspoon vanilla extract
- For the Fruit & Protein Filling:
- 1 cup (240g) mixed berries (fresh or frozen, like raspberries and blueberries)
- 2 tablespoons (30g) vanilla or berry-flavored protein powder (casein or whey)
- 1 tablespoon chia seeds
- 1–2 tablespoons (15-30ml) water or almond milk, as needed
- 1 tablespoon (15ml) maple syrup or honey (optional)
- ½ teaspoon lemon juice
- For the Protein Glaze:
- ½ cup (60g) powdered erythritol or sugar-free powdered sweetener
- 2 tablespoons (30g) vanilla or unflavored protein powder (whey or casein)
- 2–3 tablespoons (30-45ml) almond milk or water
- ¼ teaspoon vanilla extract
- A tiny pinch of salt
- Optional: Food coloring or sprinkles
Instructions
- Phase 1: Preparing the Protein Pastry Dough:
- Combine Dry Ingredients: In a large mixing bowl, whisk together all-purpose flour, protein powder, erythritol (or chosen granular sweetener), baking powder, and salt. Ensure it’s well combined to avoid lumps, especially from the protein powder.
- Cut in the Cold Butter: Add very cold, cubed unsalted butter to the dry ingredients. Use a pastry blender, two knives, or your fingertips (working quickly) to cut the butter into the flour mixture until it resembles coarse crumbs with pea-sized pieces. Keep the butter cold for a flaky texture.
- Introduce Wet Ingredients: In a separate small bowl, combine ice-cold water and vanilla extract. Slowly add this liquid mixture to the flour and butter mixture, starting with ¼ cup. Stir with a fork until the dough just begins to come together. Add additional tablespoons of ice water gradually if the dough is too dry, mixing gently until a cohesive ball forms. Avoid overmixing to prevent a tough pastry.
- Form and Chill the Dough: Gently gather the dough into a disk shape, flatten it slightly, wrap tightly in plastic wrap, and refrigerate for at least 30 minutes to an hour. Chilling relaxes the gluten and re-chills the butter, essential for a flaky protein pastry.
- Prepare Your Workspace: While the dough chills, prepare parchment paper, a rolling pin, and a sharp knife or pizza cutter for efficient work.
- Phase 2: Crafting the Filling:
- Combine Ingredients: In a small saucepan, combine mixed berries, two tablespoons of water (or almond milk), and optional maple syrup or honey. Bring to a gentle simmer over medium heat, cooking for 5-7 minutes until berries soften and break down.
- Thicken and Flavor: Remove from heat. Stir in protein powder, chia seeds, and lemon juice. Mix well until protein powder is incorporated. Chia seeds will thicken the mixture as it cools.
- Adjust Consistency: Allow the filling to cool for 10-15 minutes. It will thicken significantly. If too thick, add more water or almond milk. If too thin, let it sit longer or add a tiny bit more chia seeds. The ideal consistency is thick enough to hold its shape but spreadable.
- Taste and Adjust: Taste and adjust sweetness or acidity with more sweetener or lemon juice if desired. This protein-packed filling is key for your Protein Pop Tarts.
- Phase 3: Assembling and Baking Your Pop Tarts:
- Preheat Oven and Prepare Baking Sheet: Preheat oven to 375°F (190°C) and line a large baking sheet with parchment paper.
- Roll Out the Dough: Retrieve chilled dough. On a lightly floured surface or between parchment paper, roll out the dough into a large rectangle, roughly 1/8 to 1/4 inch thick (approximately 12×16 inches).
- Cut into Rectangles: Trim edges to create a neat rectangle. Cut the large rectangle into 8 smaller, even rectangles (about 3×4 inches each), yielding 4 complete protein pop tarts.
- Portion the Filling: Spoon 1-2 tablespoons of the cooled berry-protein filling onto the center of four dough rectangles, leaving a ½-inch clear border. Do not overfill to prevent leakage.
- Create the Top Layer: Place the remaining four dough rectangles on top of the filled ones, aligning edges.
- Seal the Edges: Press down around the edges of each pop tart with fingertips to seal. Firmly crimp all around the edges with a fork for a classic look and to secure the filling. This prevents the delicious goo from escaping during baking.
- Vent the Pop Tarts: Poke a few small holes in the top of each pop tart with a fork or skewer to allow steam to escape and prevent puffing or cracking.
- Bake to Golden Perfection: Transfer assembled protein pop tarts to the prepared baking sheet. Bake for 15-20 minutes, or until edges are golden brown and pastry is cooked through. Monitor closely.
- Cool Completely: Remove from oven and transfer to a wire rack to cool completely. This allows the pastry to firm up and the filling to set. Cool for at least 30 minutes before glazing.
- Phase 4: Whipping Up the Protein Glaze:
- Combine Dry Glaze Ingredients: In a small bowl, combine powdered erythritol (or powdered sweetener) and protein powder. Whisk to prevent lumps.
- Add Wet Ingredients: Gradually add almond milk (or water) and vanilla extract, stirring continuously. Start with 2 tablespoons of liquid and add more as needed to reach a smooth, pourable consistency. Add a tiny pinch of salt to balance sweetness.
- Adjust Consistency: The glaze should be thick enough to coat a spoon but still flow. Adjust with more milk if too thick, or more powdered sweetener/protein powder if too thin.
- Optional Enhancements: Add food coloring for vibrancy or lemon zest for extra flavor. This protein glaze enhances your Protein Pop Tarts.
- Phase 5: Glazing and Enjoying Your Masterpiece:
- Glaze the Cooled Pop Tarts: Once completely cool, drizzle or spread the protein glaze evenly over the top of each pop tart. This prevents the glaze from melting and running off.
- Add Optional Toppings: If using sprinkles, scatter them over the wet glaze immediately so they adhere.
- Allow Glaze to Set: Let glazed protein pop tarts sit on the wire rack for at least 15-20 minutes, or until the glaze has fully set and hardened.
- Serve and Enjoy: Serve your delicious homemade Protein Pop Tarts with coffee or as a quick breakfast or snack.
- Storage: Store in an airtight container at room temperature for up to 3 days, or in the refrigerator for up to a week. They are freezer-friendly without the glaze; thaw and apply fresh glaze when ready. Enjoy cold or gently warmed.
Notes
- Keep butter and water very cold when making the dough for a flaky texture.
- Do not overmix the dough to prevent it from becoming tough.
- Do not overfill the pop tarts to prevent leakage during baking.
- Ensure pop tarts are completely cool before glazing to prevent a runny glaze.
- Store protein pop tarts in an airtight container for freshness.
- Experiment with different protein powder flavors and fruit fillings to customize your protein pop tarts.
Nutrition
- Serving Size: 1 pop tart
- Calories: 415
- Sugar: 16g
- Sodium: 180mg
- Fat: 16g
- Saturated Fat: 9g
- Unsaturated Fat: 7g
- Trans Fat: 0g
- Carbohydrates: 48g
- Fiber: 4g
- Protein: 25g
- Cholesterol: 35mg


Leave a Reply