
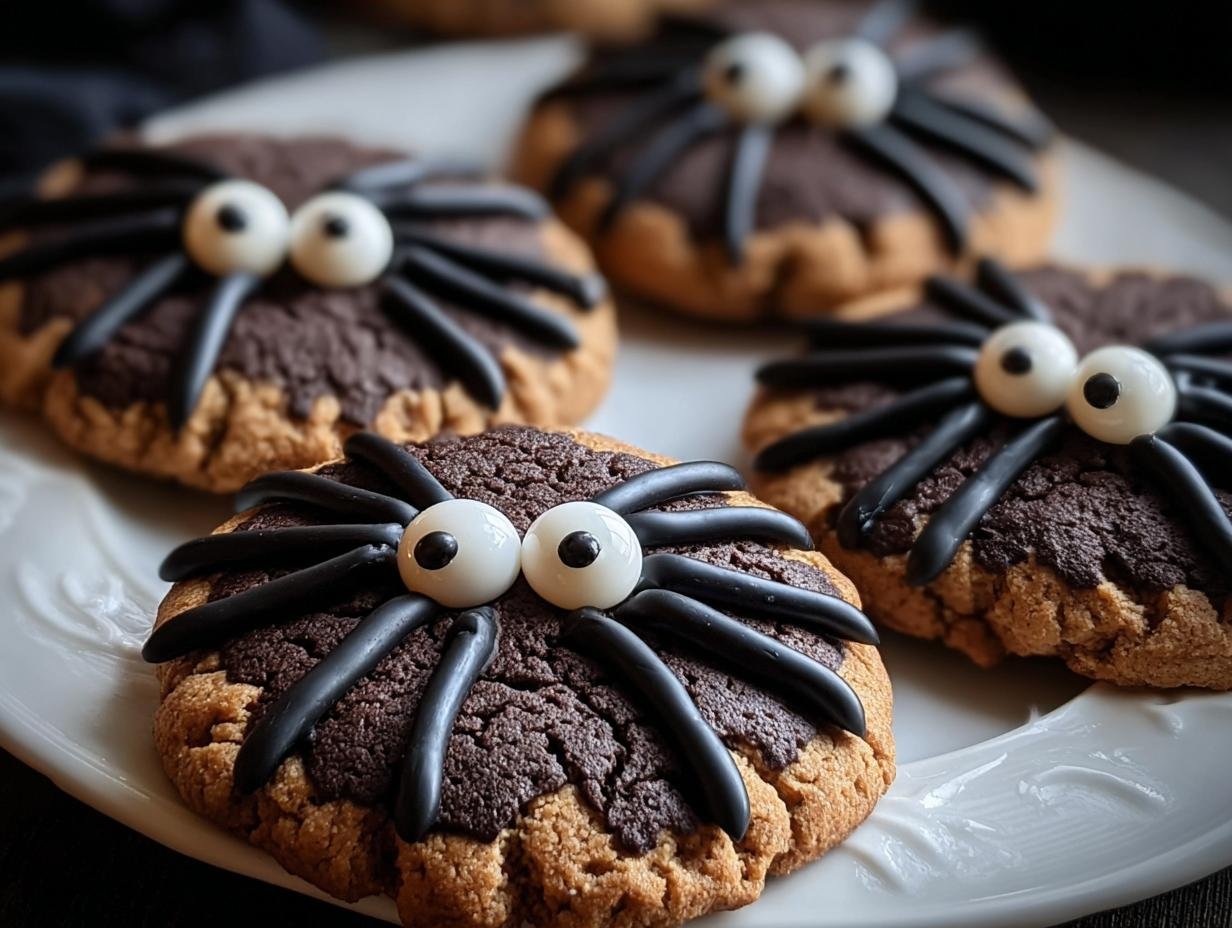
Spooky spider cookies have become my absolute favorite tradition for Halloween! I remember baking them with my mom when I was little, the kitchen filling with the sweet scent of sugar and vanilla as we rolled dough into little balls. Now, making these easy spooky spider cookies with my own kids brings back all those cherished memories. The best part is seeing their faces light up as they decorate them, turning simple cookies into creepy crawly delights with candy eyes and licorice legs. They’re not just cookies; they’re edible art that’s frightfully fun to make and even more fun to eat! Let’s get baking some spider-themed Halloween treats!
Why You’ll Love These Spooky Spider Cookies
These aren’t just any cookies; they’re a ticket to Halloween fun! You’ll adore them because:
- They’re incredibly easy spooky spider cookies to make, even with little helpers.
- The simple decorating process is a blast for kids and adults alike.
- They look super impressive, making them perfect for parties and bake sales.
- The classic chocolate chip cookie base is always a crowd-pleaser.
- You can customize the spider legs and eyes for unique spooky cookie designs.
- They are a fantastic way to create memorable spider-themed Halloween treats.
- The sweet, satisfying crunch is pure cookie bliss.
- They bring a delightful spooky vibe to any Halloween gathering.
Ingredients for Spooky Spider Cookies
Gather these simple items to create your batch of Halloween spider cookies. I love that most of these are pantry staples, making it easy to whip up these treats whenever the Halloween spirit strikes!
- 1 cup unsalted butter, softened – Using softened butter helps create a creamy dough base for the best texture.
- 1 cup granulated sugar – This sweetens the cookies and helps them spread just right.
- 1 large egg – An egg acts as a binder, holding all our delicious ingredients together.
- 1 tsp vanilla extract – A touch of vanilla adds that classic, comforting cookie flavor.
- 2 1/2 cups all-purpose flour – This is the structure of our cookies, making sure they hold their shape.
- 1/2 tsp salt – Salt balances the sweetness and enhances the overall flavor.
- 1/2 tsp baking powder – This leavening agent gives the cookies a slight lift, making them tender.
- 1 cup semi-sweet chocolate chips – These are perfect for melting into a luscious coating for our spiders.
- 1/2 cup candy eyes – The essential feature to give our spiders their creepy, crawly look!
- 1/4 cup black licorice strings, cut into 1-inch pieces – These are ideal for creating those distinctive spider legs.
How to Make Spooky Spider Cookies
Get ready to create some frightfully fun treats! These easy spooky spider cookies are so simple to assemble, and the process is just as fun as the final product. Follow these steps to bring your creepy crawlers to life!
- Step 1: First things first, preheat your oven to 350°F (175°C). Line a baking sheet with parchment paper to prevent sticking and make cleanup a breeze.
- Step 2: In a large bowl, grab your softened butter and granulated sugar. Cream them together until the mixture is light and fluffy, which usually takes about 2 to 3 minutes. This step is key for a tender cookie.
- Step 3: Beat in the large egg and vanilla extract until everything is just combined. Don’t overmix here; we want a cohesive dough.
- Step 4: In a separate bowl, whisk together your all-purpose flour, salt, and baking powder. Having your dry ingredients pre-mixed ensures they get evenly distributed.
- Step 5: Gradually add the dry ingredients to your wet ingredients. Mix on a low speed until a soft dough forms. It should be slightly sticky but manageable.
- Step 6: Roll the dough into uniform 1-inch balls. Place them about 2 inches apart on the prepared baking sheets. This gives them enough space to spread slightly without touching.
- Step 7: Bake for 10-12 minutes, or until the edges are just lightly golden. Let the cookies cool completely on the baking sheet; they will continue to set as they cool.
- Step 8: While your cookies are cooling, melt the semi-sweet chocolate chips. Use a microwave-safe bowl and heat in 30-second bursts, stirring between each, until the chocolate is smooth and glossy.
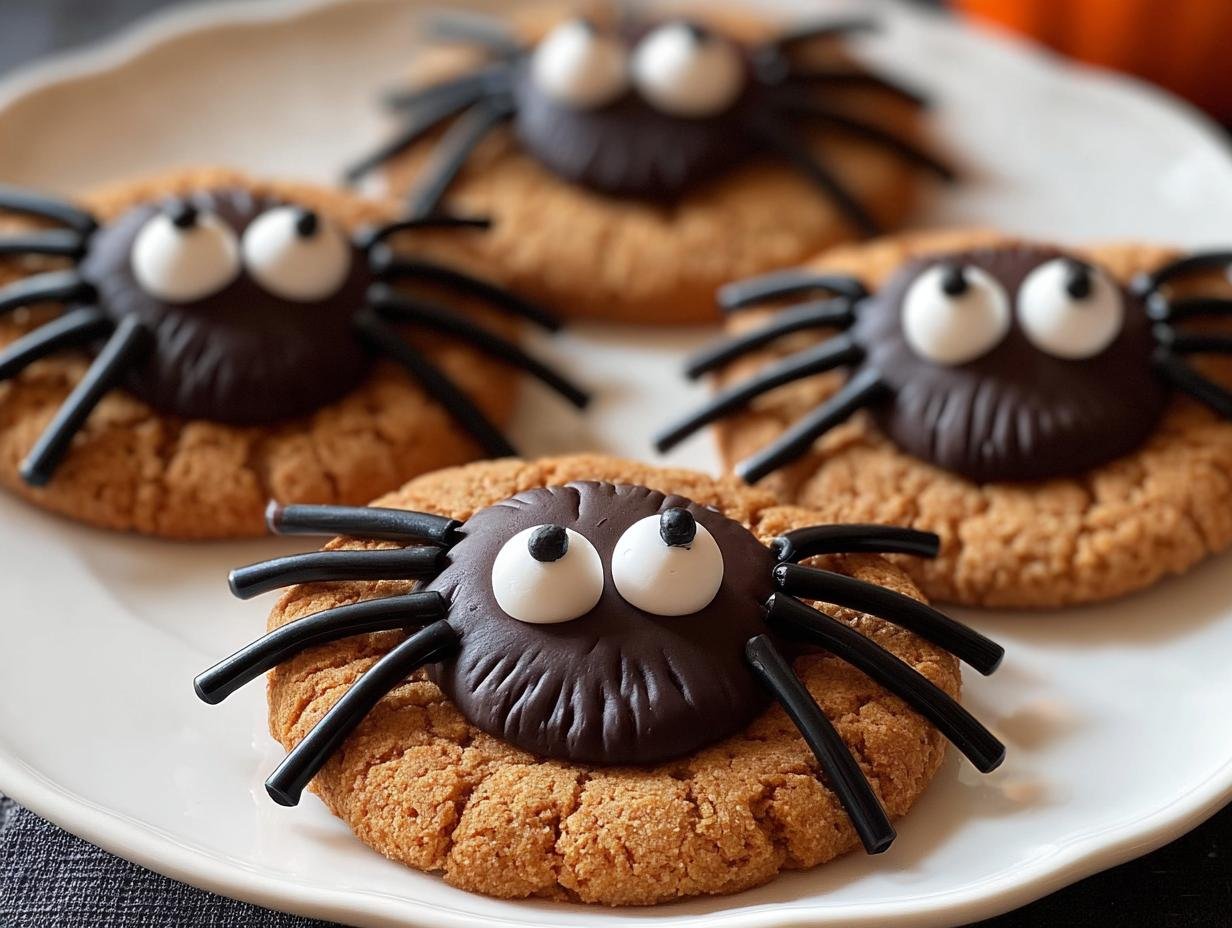
- Step 9: Once the cookies are completely cool, dip the top half of each cookie into the melted chocolate. This forms the spider’s body and a base for decorations.
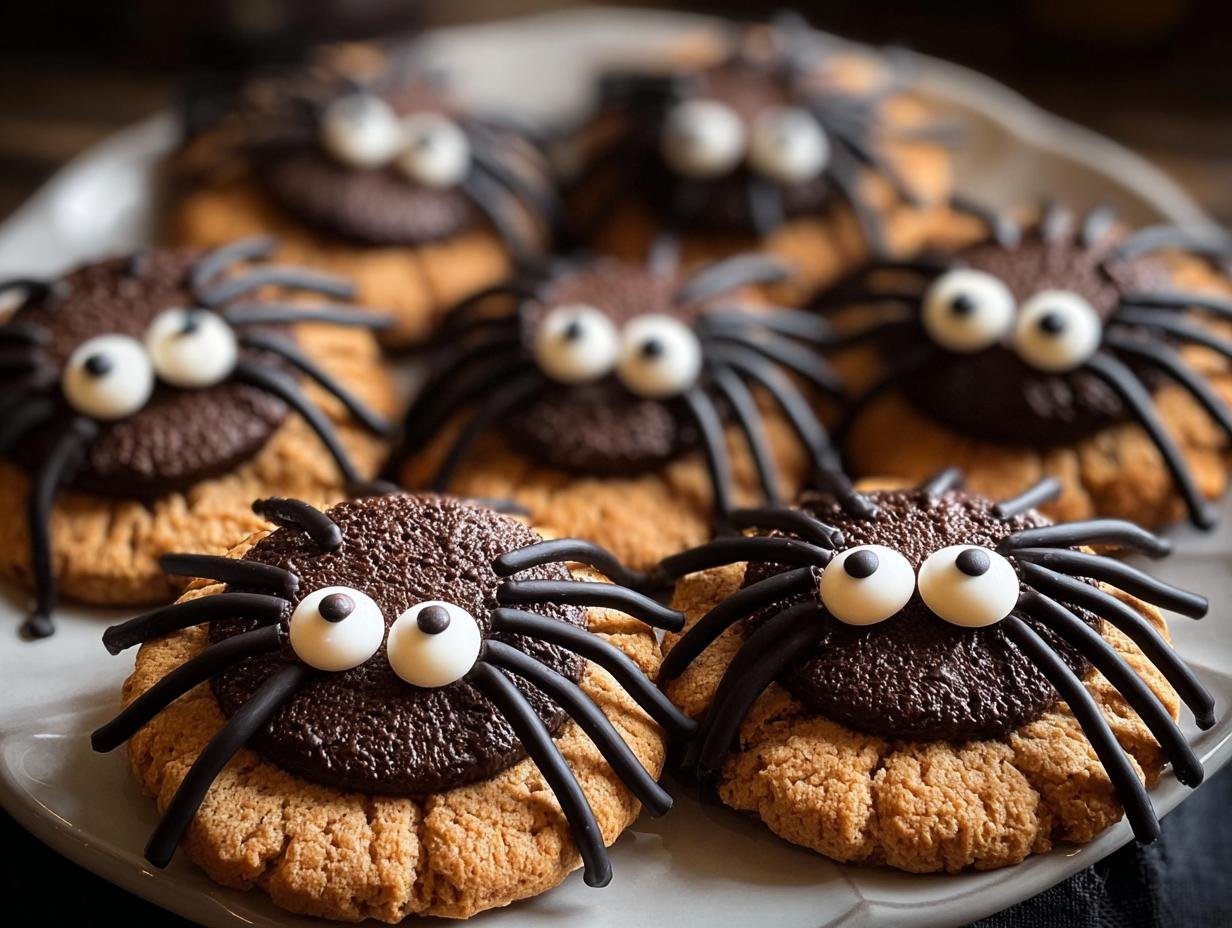
- Step 10: Place the dipped cookie back onto the parchment paper. Immediately press two candy eyes into the wet chocolate.
- Step 11: While the chocolate is still wet, artfully arrange four licorice pieces per side to create the spider legs. These spider-themed Halloween treats are really coming to life now!
- Step 12: Let the chocolate harden at room temperature for about 20 minutes, or until firm. Now you have wonderfully spooky spider cookies for kids!
Pro Tips for the Best Spooky Spider Cookies
Want to make your Halloween spider cookies absolutely perfect? I’ve picked up a few tricks over the years that really elevate these fun treats. These tips will help you achieve the best texture and spookiest look for your spider-themed Halloween treats.
- For a smoother chocolate dip, add a teaspoon of coconut oil when melting the chocolate chips. It makes the chocolate more fluid and easier to work with.
- If you don’t have black licorice strings, pretzel sticks or chocolate-covered chow mein noodles can be used for legs. Get creative with what you have!
- Ensure your cookies are completely cool before dipping them in chocolate. Warm cookies will melt the chocolate and make a mess.
What’s the secret to perfect spooky spider cookies?
The secret to perfect spooky spider cookies lies in the dough consistency and proper cooling. Creaming the butter and sugar well ensures a tender cookie, and letting them cool completely before dipping prevents chocolate chaos! For more baking tips, check out tips on baking.
Can I make spooky spider cookies ahead of time?
Absolutely! You can bake and completely cool the cookies up to 3 days in advance. Store them in an airtight container at room temperature. Decorate them the day you plan to serve them for the freshest look.
How do I avoid common mistakes with spooky spider cookies?
Avoid overmixing the dough, which can lead to tough cookies. Also, don’t rush the cooling process; dipping warm cookies is a recipe for a melty disaster. Finally, ensure your licorice legs are placed while the chocolate is still wet so they stick!
Best Ways to Serve Spooky Spider Cookies
These spider-themed Halloween treats are too cute to eat, but once you start, you won’t be able to stop! They’re fantastic on their own, but imagine them as part of a larger dessert spread. They pair wonderfully with a creamy vanilla milkshake or a crisp apple cider, creating a perfect balance of sweet and tart. For a delightful dessert option, consider trying our berry crumble.
For a truly festive presentation, arrange your Halloween spider cookies on a tiered stand alongside mini pumpkin pies or ghost-shaped meringues. They also make a delightful addition to a Halloween candy buffet, offering a homemade touch among store-bought sweets. These spider cookies for kids are guaranteed to be a hit at any party!
Variations of Spooky Spider Cookies You Can Try
While these easy spooky spider cookies are fantastic as is, you can totally switch things up to fit your needs! I love experimenting with different flavors and dietary options to make these spider-themed Halloween treats accessible to everyone. Don’t be afraid to get creative with your DIY Halloween cookies!
- Gluten-Free Spiders: For those avoiding gluten, simply swap out the all-purpose flour for a good quality 1:1 gluten-free baking blend. The texture will be very similar, and you’ll still get delicious spiderweb cookies recipe results.
- Vegan Creepy Crawlers: To make these vegan, use a plant-based butter substitute, swap the egg for a flax egg (1 tbsp flaxseed meal + 3 tbsp water, let sit for 5 minutes), and use dairy-free chocolate chips for the coating. These vegan delights are just as spooky and tasty!
- Chocolate Lover’s Spiders: Amp up the chocolate flavor by using Dutch-process cocoa powder in the cookie dough itself. You can also use dark chocolate chips for dipping if you prefer a less sweet spider.
- Spiced Spider Cookies: Add a pinch of cinnamon and nutmeg to the dry ingredients for a warm, spiced cookie base. This gives your spooky edible spiders a cozy flavor perfect for autumn parties.
Nutrition Facts for Spooky Spider Cookies
When you’re whipping up these fun Halloween spider cookies, it’s good to know what you’re serving. These numbers are based on the recipe as written, but remember that individual cookie sizes and ingredients can slightly change the final count. These spider cookies for kids are a delicious treat!
- Serving Size: 1 cookie (about 1.5 oz)
- Calories: 150 kcal
- Fat: 8g
- Saturated Fat: 5g
- Unsaturated Fat: 2g
- Trans Fat: 0g
- Carbohydrates: 18g
- Fiber: 1g
- Sugar: 10g
- Protein: 2g
- Sodium: 50mg
- Cholesterol: 20mg
Nutritional values are estimates and may vary based on specific ingredients used. For more information on nutritional content, you can refer to resources like the USDA’s guide to nutrition labeling.
How to Store and Reheat Spooky Spider Cookies
Properly storing your Halloween spider cookies ensures they stay fresh and spooky for your guests. Once your adorable spooky edible spiders have completely cooled on the baking sheet, it’s time to think about storage. For short-term keeping, place the cooled cookies in an airtight container at room temperature. They’ll stay delicious for up to 3-4 days, making them perfect for early Halloween party prep. If you’re looking for other dessert storage tips, check out our guide on storing apple pie.
If you need to store these spider cookies for kids for longer, the freezer is your best friend! Wrap the cooled cookies tightly in plastic wrap, then place them in a freezer-safe bag or container. They can be frozen for up to 3 months. When you’re ready to serve, simply thaw them overnight in the refrigerator. For a quick refresh, you can gently reheat individual cookies in a 300°F (150°C) oven for 3-5 minutes until slightly warmed. Enjoy your perfectly preserved spiderweb cookies recipe treats!
Frequently Asked Questions About Spooky Spider Cookies
Can I use different types of cookies for these spooky spider cookies?
While this recipe is designed for a perfect chocolate chip base, you can certainly adapt it! Using a simple sugar cookie or shortbread cookie as your base will work well. Just ensure the cookie is firm enough to hold the chocolate and decorations. These spider-themed Halloween treats are quite versatile!
What other decorations can I use for my spider cookies?
Get creative with your spider cookie decorating ideas! Instead of black licorice, try thin pretzel sticks, chocolate-covered string or shoestring candy, or even piped black icing for the legs. For the eyes, besides candy eyes, you could use small dots of white icing with a tiny black dot in the center, or even mini chocolate chips. For more decorating inspiration, consider our cinnamon orange jam linzer cookies.
How do I make sure the chocolate coating sticks well to the cookies?
The key is ensuring your cookies are completely cool before dipping them in melted chocolate. If the cookies are even slightly warm, the chocolate will melt and slide off, creating a mess. Also, work relatively quickly once you dip the cookie, placing the eyes and legs while the chocolate is still wet so they adhere properly to your Halloween spider cookies.
Are these spooky spider cookies suitable for a school bake sale?
Absolutely! These easy spooky spider cookies are a huge hit with kids and adults alike, making them perfect for school bake sales. They are visually appealing, taste delicious, and are relatively easy to transport. Just make sure to store them in a way that keeps the decorations intact, perhaps in individual cellophane bags.
PrintSpooky Spider Cookies: 1 frightfully fun recipe

Create frightfully delicious Halloween treats with these easy spooky spider cookies. They are simple to make and perfect for kids and parties.
- Prep Time: 20 minutes
- Cook Time: 12 minutes
- Total Time: 32 minutes
- Yield: 24 cookies 1x
- Category: Dessert
- Method: Baking
- Cuisine: American
- Diet: Vegetarian
Ingredients
- 1 cup unsalted butter, softened
- 1 cup granulated sugar
- 1 large egg
- 1 tsp vanilla extract
- 2 1/2 cups all-purpose flour
- 1/2 tsp salt
- 1/2 tsp baking powder
- 1 cup semi-sweet chocolate chips
- 1/2 cup candy eyes
- 1/4 cup black licorice strings, cut into 1-inch pieces
Instructions
- Preheat your oven to 350°F (175°C) and line a baking sheet with parchment paper.
- In a large bowl, cream together the softened butter and granulated sugar until light and fluffy, about 2-3 minutes.
- Beat in the egg and vanilla extract until just combined.
- In a separate bowl, whisk together the flour, salt, and baking powder.
- Gradually add the dry ingredients to the wet ingredients, mixing on low speed until a soft dough forms.
- Roll the dough into 1-inch balls and place them about 2 inches apart on the prepared baking sheets.
- Bake for 10-12 minutes, until the edges are lightly golden. Let the cookies cool completely on the baking sheet.
- Melt the semi-sweet chocolate chips in a microwave-safe bowl in 30-second bursts, stirring until smooth.
- Dip the top half of each cooled cookie into the melted chocolate.
- Place the dipped cookie back on the parchment paper and immediately press on two candy eyes.
- While the chocolate is still wet, add four licorice pieces per side to create spider legs.
- Let the chocolate harden at room temperature for about 20 minutes.
Notes
- For a smoother chocolate dip, add a teaspoon of coconut oil when melting the chocolate chips.
- If you don’t have black licorice strings, pretzel sticks or chocolate-covered chow mein noodles can be used for legs.
- Store spooky spider cookies in an airtight container at room temperature for up to 3 days.
- Undecorated cookies can be frozen for up to a month. Thaw and decorate the day of serving.
- For gluten-free spooky spider cookies, use a 1:1 gluten-free flour blend.
- For vegan spooky spider cookies, use vegan margarine, a flax egg, and dairy-free chocolate.
Nutrition
- Serving Size: 1 cookie (about 1.5 oz)
- Calories: 150 kcal
- Sugar: 10g
- Sodium: 50mg
- Fat: 8g
- Saturated Fat: 5g
- Unsaturated Fat: 2g
- Trans Fat: 0g
- Carbohydrates: 18g
- Fiber: 1g
- Protein: 2g
- Cholesterol: 20mg


Leave a Reply